Jumat, 31 Mei 2013

putty as an alternative to hyperterminal


New laptop’s don’t come with Serial connection anymore.   That’s a problem if your studying/configuring cisco routers.   Cisco can only configured with console cable.
I searched ebay and found the RS232 to USB converter but, the driver that comes with it is not working.
I seeked help from all friendly google for the driver and found one that works for me.
Now that I installed the driver, I can now proceed with my study.
I’m going to use putty instead of hyperterminal (windows vista and windows 7 does not have hyperterminal).  Below are the procedures on how I configured putty to access my cisco router.
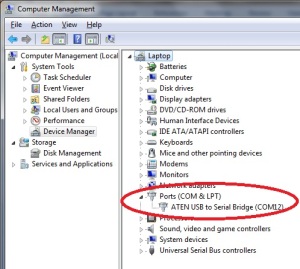
Plug your console cable to cisco router and the RS232 (female) to RS232 (male) of converter and plug the USB in your laptop.  Now, you have to check the communication port number from Computer Management (Start –> Control Panel –> Administrative Tools –> Computer Management –> Device Manager and look at Port (COM & LPT).
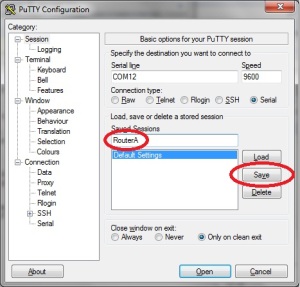
Open putty and configure:
a.  Select Serial from Connection Type
b.  Specify the COM Port number in Serial line, check the Com port from above.
c.  Speed should be 9600
d.  Click on Serial from Category to configure additional Options
e.  Flow Control should be None.
f.  Click on Window from Category and change the line of scroll back.  I use 500,000
g.  Go back to Session and save the configuration
Now, power your router and click Open (putty).
Wait for the magic to happen.
Viola!  You have your router console terminal.

source: http://andoylang.wordpress.com/2010/07/07/putty-as-an-alternative-to-hyperterminal/

Kamis, 30 Mei 2013

How to Backup & Restore Mikrotik Configuration?

Backup & Restore Configuration of router is the most important thing to do.

To Backup Configuration in RouterOS Mikrotik through terminal is just simply type command as follow:

sys bac sav nam=filename

where filename is the name of backup file.


To restore the configuration, just simply type :

sys bac loa nam=filename

In RouterOS Mikrotik, all command can be type only 3 front character.

so, sys=system, bac=backup, sav=save, loa=load, nam=name.

I hope this would help you increase your knowledge ;)


Senin, 27 Mei 2013

RAHASIA JIN YANG MEMILIKI ILMU SIHIR DAN CARA MENGHADAPINYA


Oleh : Perdana Akhmad,S.Psi
(Praktisi Ruqyah Syar’iyyah)

Al-Ghailan’ atau ‘Al-Ghul (Ghul adalah bentuk tunggal dari ghailan ) adalah sebutan untuk golongan jin  yang berilmu sihir tinggi, mereka punya kemampuan untuk merekayasa energi alam ( gelombang elektromagnetik, gelombang listrik dll) yang dipergunakan untuk kesaktian diri mereka. Dengan kelebihan yang mereka miliki mereka bisa merubah diri mereka sesuai dengan kehendak mereka, mereka bisa merubah diri menjadi hewan, manusia, Dewa Dewi (dewa shiwa, Dewi Kwan Im,  dll), malaikat yang bersayap atau makhluk yang mengerikan dialam manusia yang biasa disebut sebagai hantu (genderuo, kuntilanak , wewe gombel dll).
Ibnu Abi Syaibah meriwayatkan bahwa ada sekelompok orang yang bercerita kepada Umar bin Khatthab tentang hantu/ ghul. Saat itu Umar bin Khatthab berkata, “Sesungguhnya jin-jin itu tidak bisa berubah bentuk dari wujud aslinya seperti saat diciptakan Allah. tapi mereka mempunyai tukang sihir seperti halnya tukang sihir manusia. Apabila kalian melihat penampakan jin (hantu), maka lantunkanlah adzan.” Imam Ibnu Hajar al-Asqalani menyatakan bahwa sanad riwayat tersebut shahih. Dan Syekh Wahid Abdus Salam Bali (ulama salafy) menambahkan bahwa ada riwayat serupa dari Ibnu Abid Dunya dan sanad haditsnya hasan (baik). (Kitab al-Wiqayah: 28).
Dalam hadits Rasulullah, Apabila Rasulullah ditanya mengenai Al-Ghailan, sabda Baginda “mereka itu adalah tukang sihir golongan jin.”
Dan perkuatkan dari riwayat Para Sahabat: Saad bin abi Waqqas r.a. mengatakan, Kami diperintahkan untuk segera bersholat (memohon perlindungan Allah) apabila terlihat al-Ghailan, yaitu golongan ahli sihir bangsa jin.
Kelompok Ghailan memiliki tingkat strata yang tinggi dialamnya (namun kemampuan ilmu sihirnya masih dibawah azazil/iblis). Kemampuan tukang sihir kalangan jin ini ( Ghailan) dalam ilmu kesaktian, ilmu untuk membunuh dan menyakiti lawannya banyak digunakan dikalangan jin sendiri maupun membantu para dukun/paranormal bahkan para praktisi ilmu metafisika dikalangan manusia baik mereka sadari ataupun tidak mereka sadari.
Dikalangan sebangsa mereka ada golongan jin yang jika ingin masuk kealam manusia dan mengambil wujud tertentu mengadakan kerjasama dengan ghailan, maka ghailan dengan ilmu sihir yang dimiliknya memberikan kekuatan pada bangsa jin hingga bangsa jin (tingkat rendah) ini bisa masuk kealam manusia dan bisa mengambil wujud tertentu (raksasa, peri, genderuwo dll) yang diinginkannya setelah ditransfer “kekuatan” oleh Ghailan ini.
Ghailan ini juga memiliki tingkatan, tingkatan tertinggi dari ghailan disebut dengan al-hin.  Dimensi alam al-hin lebih tinggi dari dimensi alam jin kebanyakan. Perlu dipahami para pembaca, alam ghoib banyak memiliki tingkatan dimensi ( jika Allah Ta’ala Rabku meridhoi akan saya bahas pembagian dimensi alam jin dengan rahasia didalamnya bersumberkan dari Al-Qur’an dan sunnah).
Ada beberapa peruqyah (dari beberapa rujukan yang saya baca) meyakini bahwa Al-Hin ini adalah golongan makhluk halus yang memiliki alur genetika yang hampir sama dengan Azazil (Iblis), Azazil sendiri walaupun dia sebangsa jin namun bukan moyangnya jin yang mendiami bumi sekarang ini. Ada yang mengatakan al-hin unsur penyusun tubuhnya memiliki kelebihan dibandingkan golongan jin kebanyakan. Jika golongan jin hanya memiliki unsur api, maka Al-Hin ini selain ada unsur api (unsur awal yang telah diberikan Allah Ta’ala) juga memiliki unsur angin dan air ( 3 unsur) namun tidak memiliki unsur tanah sebagai mana manusia yang sempurna memiliki 4 unsur dalam tubuhnya ( tanah, air, api, udara). Al-Hin hakikatnya adalah jin mutan karena dengan kecanggihan rekayasa ilmiah mereka dalam batasan tertentu mampu memasukkan unsur angin dan air ke dalam unsur utama penyusun tubuh yang bercampur dengan unsur api (Istilah kerennya rekayasa genetika).
Namun tidak unsur tanah! Mereka sampai kiamat tidak akan bisa memasukkan unsur tersebut dalam tubuhnya karena unsur tanah hanya milik khalifah anak-anak Adam di dunia ini dan mereka (Ghailan) terlalu sombong dan congkak (sebagaimana Iblis ) merasa lebih baik unsurnya dari api dibanding tanah hingga mengharamkan adanya unsur tanah ditubuh mereka.
Al-Hin ini banyak dipuja dan disembah oleh Umat Hindu, Kong Hu chu, Tao, Budha sebagai Dewa Dewi dan kelompok jin ini memang menyebarkan agama pagan/berhala dengan mereka sendiri sebagai tuhan yang disembah. Al-Hin (dewa dan dewi) banyak menurunkan dan menginisiasi (memberikan attunement/penyelarasan) energi para para praktisi Tenaga Dalam, Prana, Chi, KI, Reiki. Memberikan kekuatan sihir pada ahli yoga maupun para biksu hingga memiliki kekuatan mistik tertentu.
Lihat link di http://reikinaqs.wordpress.com/2010/11/20/colours-of-angels-reiki/  dan bagaimana para malaikat (yang pada hakikatnya jin Al-Hin) memberikan attunement/penyelarasan energi pada praktisi energi esoteris).
Lihat juga di http://reikinaqs.wordpress.com/2010/11/20/sacred-flames-reiki/ bagaimana Ghailan ini menyaru membohongi praktisi metafisika dengan merubah bentuk tubuh mereka menjadi tokok-tokoh ahli sihir manusia yang sudah meninggal seperti Ascended Masters El Morya, Lanto, Serapis Bey, Paul the Venetian, Hilarion, Lady Nada, dan St. Germain yang diyakini sudah mencapai tahap kesempurnaan menjadi tubuh cahaya hingga bisa memberikan ilmu metafisika para praktisinya.
Ghailan ini juga sangat suka menyaru menjadi Dewa dan Dewi lalu membantu manusia untuk mendapatkan ilmu metafisika, seperti Dewa Shiwa yang memberikan Kekuatan Gtummo, Atau Dewi Kwan Im yang memberikan Energi Violet Flame.
Dewa dan Dewi yang disembah umat Hindu seperti Dewa Shiwa, Brahma, Whishnu, Hanoman, Dewi Sri dll adalah Pentolaan /Raja dikalangan Ghailan begitu juga dengan Dewi Kwan Im dll. Kadang dikalangan Dewa-Dewi Ghailan sendiri dapat terjadi percekcokan dan perkelahian dan perebutan kekuasaan persis seperti di alam manusia.
Dikalangan umat Islam Al-Hin ini banyak memberikan bantuan pada para praktisi ilmu hikmah dan berbagai Perguruan Olah Nafas Tenaga Dalam yang kebanyakan tidak praktisinya sadari bahwa mereka mendapatkan kekuatan tenaga dalamnya dari Ghailan (yang memang ditugasi khusus oleh Iblis Azazil untuk memberikan kekuatan metafisika/Tenaga dalam pada umat manusia yang akan disesatkannya) . Al-Hin juga banyak memiliki anak buah dikalangan jin yang menjadi pesuruh mereka dalam mengerjakan sihir.
latihan tenaga Dalam dan Tenaga Metafisika Perguruan Hikmatul Iman
Saya pernah bertemu dengan Al-Hin ini ketika beberapa tahun yang lalu masih mendalami kekuatan energi esoteris, ketika bermeditasi Ghailan jenis Al-Hin menyaru sebagai Dewa Shiwa menemui saya secara khusus (lihat kisah lengkapnya di sini).
Ghailan jenis Al-hin ini makhluknya cukup banyak mendiami bumi yang hanya Allah Ta’ala yang tahu jumlahnya, Umat Hindu meyakini Dewa Dewi (yang hakikatnya jin jenis al-hin) yang mereka yakini hanya berjumlah ratusan ribu dan hanya beberapa dewa dewi saja yang mereka sembah. Namun Dewa-Dewi (al-hin) kehidupan mereka masih dibawah kekuasaan dan pengaruh Azazil.

Pertemuan kedua saya dengan Al-hin ini secara tidak sengaja pernah terjadi. Kisahnya bermula ketika saya meruqyah pasien yang terkena sihir, pasien itu dapat melihat alam ghoib akibat dari sihir yang dideritanya. Saya memintanya untuk menelusuri sumber sihir yang menimpa dirinya, tak dinyana dalam pandangannya dia melihat ada sosok jin bertangan 4 didalam lokasi sebuah candi yang megah persis seperti wujud Dewa Shiwa didalam agama Hindu. Beruntung saya sudah membentengi diri pasien ( dengan ruqyah pembentengan) hingga scaning yang dilakukan tidak terdeteksi oleh oleh Jin  bertangan 4 itu.
Menghadapi Ghailan jenis Al-hin ini gampang-gampang susah, Sebab mereka memiliki ilmu sihir pendinding, jika jenis jin biasa kadang memiliki perisai (armor) bersifat fisik ( baju besi/ perisai kulit ) di alamnya akan mudah dipecahkan dengan bacaan ayat tertentu ( seperti bacaan lau anzalna….) berbeda dengan Ghailan (tukang sihir dikalangan jin) jenis Al- Hin, mereka punya tekhnologi sihir pendinding yang cukup hebat yang bersumberkan dari kekuatan alam yang berbentuk hijab cahaya yang melapisi dan melindungi tubuh mereka dari berbagai macam serangan bahkan menjadi benteng pertahanan (sampai batasan tertentu) dari “tembakan” energi ruqyah yang terpancar ketika dibaca peruqyah.
Kemampuan ilmu sihir dengan menggunakan kekuatan alam memang banyak dimiliki oleh Jin Ghailan ini. Sebagaimana Ibn Qayyim menjelaskan hakikat sihir, beliau berkata, ”Sihir adalah kumpulan pengaruh roh-roh jahat (setan dikalangan jin dan manusia) dengan kekuatan alam darinya.” (Ibn Qayyim al-Jauziah,Zad al-Ma’ad,jilid IV,h.126). Kemampuan Ghailan menggunakan unsur kekuatan alam luar biasa, dengan ilmu pengetahuan yang dimilikinya, selain hijab pendinding mereka bahkan juga mampu memiliki beraneka senjata ghoib yang bisa membunuh jin bahkan manusia (berbentuk chakra, panah api, kilatan listrik/petir dll). Jika tidak karena Pertolongan Allah dengan membaca Dzikir/doa perlindungan niscaya akan banyak peruqyah yang akan mati karena senjata tersebut.
Sudah banyak korban nyawa manusia yang mati akibat kekuatan sihir Al-Hin ini, ada banyak cerita penghusada (penyembuh) yang menggunakan energi esoteris mati karena mencoba mengobati pasien yang terkena sihir Al-Hin ini dengan kematiaan yang tiba-tiba. Para penghusada yang menggunakan tenaga dalam, prana, chi, ki, reiki tentu bukan tandingan Al-Hin yang memang pakarnya dalam ilmu sihir. tenaga dalam, prana, chi, ki, reiki kebanyakan dari hasil inisiasi A-hin sendiri, maka mudah saja bagi mereka mengalahkan praktisinya.
Yang dapat mengalahkan ghailan hanyalah Pertolongan Allah Ta’ala dengan “ENERGI LANGIT” yang bersumber dari Langit ke tujuh dimensi tertinggi di alam malakut (yang bukan tandingan dimensi kekuatan alam jin) yang mengalahkan mereka ketika praktisi ruqyah membaca ayat-ayat ruqyah dengan niat menghancurkan jin jenis Ghailan ini.
Jin Ghailan ini jika mereka menghendaki kadang masuk kedalam tubuh manusia secara langsung (walau mereka sendiri memiliki banyak anak buah), mereka masuk dengan missi membantu manusia untuk memiliki ilmu sihir tingkat tinggi, Biasanya mereka membantu para praktisi metafisika, ahli yoga ataupun para pertapa hingga mereka memiliki kesaktian luar biasa ( bisa terbang, berjalan diatas air, melihat tembus pandang, melihat alam ghoib, merubah tubuh menjadi raksasa, praktisinya bisa berubah menjadi hewan atau makhluk tertentu, bahkan membuat manusia mempunyai daya tahan tubuh luar biasa hingga tidak memerlukan makan dan minum selama puluhan tahun dll) baik mereka sadari dengan meminta bantuan secara langsung maupun tidak mereka sadari bahwa kemampuan ajaib mereka atas bantuan Jin Ghailan.
Waspadalah bagi peruqyah yang berhadapan dengan jin “master sihir” jenis ghailan ini! Mereka sangat sulit dikalahkan jika tidak tahu tekhniknya. Jika sedang merasuki tubuh manusia ciri mereka adalah :
  1. Berbau harum.yang dapat dicium baunya oleh peruqyah dan pasien.
    1. Pasien dipastikan dapat melihat alam ghoib.
    2. Terkesan tidak mempan diruqyah walau sudah dibacakan sampai berpuluh-puluh ayat tetap saja santai dan malah menkotbahi peruqyah.
    3. Bulu kuduk peruqyah selalu meremang dan rambut dikepala terasa terangkat.
    4. Perpuluh-puluh kali pasien diruqyah tetap jinnya tidak bisa dikeluarkan.
    5. Peruqyah mendapatkan lebam-lebam ditubuh mereka setelah meruqyah pasien.
    6. Sangat senang disembah dan dipuja manusia dan mempunyai kesombongan yang sangat tinggi ketika berhadapan dengan peruqyah.
Menghadapi Tukang sihir dikalangan jin (Al-Ghailan) sangat merepotkan dan membahayakan peruqyah dan pasien, hal terpenting untuk mengalahkannya adalah dengan menghancurkan terlebih dahulu ilmu sihir pendinding yang mereka miliki dan ini butuh waktu tergantung dengan tingkat kekuatan energi pendinding yang mereka miliki dan tingkat ketakwaan dan kekuatan jiwa peruqyah dan pasien.
Jangan harap peruqyah akan langsung membakar jasad jin ghailan ini, sebab sebelum energi ruqyah mengenai/membakar tubuh mereka, terlebih dahulu energi ruqyah  harus berhadapan dengan cahaya hijab pendinding dari unsur energi alam yang mereka miliki. Belum lagi jika timbul rasa takut dan ragu dihati peruqyah ketika menghadapi kenyataan jin tersebut seolah tidak mempan dengan bacaan ruqyah maka jin ghailan ini langsung akan melakukan serangan balik dengan berbagai persenjataan ghoib yang mereka miliki sebab benteng peruqyah dalam keadaan lemah karena ketidak yakinannya dan ini bisa dilihat oleh jin ghailan.
Menghancurkan sihir pendinding yang mereka miliki adalah awal dari upaya kita untuk mengalahkan jin ghailan ini, Maka tekhniknya adalah mengarahkan NIAT kita ketika membaca ayat-ayat ruqyah untuk MENGHANCURKAN/MELENYAPKAN sihir pendinding yang mereka miliki terlebih dahulu ketika kita melihat kenyataan bacaan ruqyah kita sama sekali terlihat secara dzahir tidak menyakiti jin tersebut.
Tekhniknya adalah :
  1. Azamkan niat untuk menghilangkan ilmu pendinding jin ghailan dengan berdoa pada Allah Ta’ala :” Ya Allah, hambamu memohon agar diberi kekuatan melalui Ayat-ayat-Mu ya Allah untuk menghancurkan dan menghilangkan secara sempurna sihir pendinding jin tersebut agar hambamu ini bisa membakar tubuh jin yang mengganggu fulan/fulanah” ( bisa dengan kata-kata lainnya)
  2. Bacalah fatehah 1x,al baqarah 285-286 3x,al a’raf 117-122 3x,yunus 81-82 3x,thaha 69 3x,al isra 81 7x dan al mukiminun 115-118 7x sembari tangan memegang ubun-ubun atau dada pasien tiap selesai satu surat hembuskan ke ubun-ubun dan dada pasien (sembari menepuk-nepuk ubun-ubun dan dada) dengan meniatkan untuk menghilangkan sihir pendinding yang melindungi jin tersebut.
  3. Bacakan juga di air yang berisi es batu dan perasan jeruk nipis 9 buah lalu kita mandikan pasien dengan air dingin jeruk nipis yang sudah diruqyah dengan juga berniat untuk menghilangkan secara sempurna hijab pendinding jin ghailan tersebut.
  4. Ulangi terus-menerus sampai kita melihat reaksi kesakitan jin ghailan tersebut ( waktu sangat tergantung, bisa cepat dan bisa lambat sampai-berhari-hari bahkan berminggu-minggu) jika sudah melihat reaksi kesakitan atau jin tersebut berteriak kepanasan maka sudah saatnya kita langsung mengubah niat untuk membakar atau menghancurkan jin tersebut. Sampai dia hancur atau mengaku kalah dan menyerah.
Adapun jika ghailan langsung muncul dialam manusia (dengan bentuk/wujud tertentu seperti seberkas cahaya, dewa dan dewi, raksasa, hantu dll) maka sesuai anjuran Rasulullah kita harus mengumandangkan adzan dan berdzikir untuk mengusirnya. Rasulullah pernah bersabda, “Jika ghailan (tukang sihir dikalangan jin) muncul, segeralah beradzan dan berdzikir untuk mendapatkan perlindungan Allah dan menjadikan mereka lari terpontang-panting.” Hadits ini diriwayatkan oleh Imam Ahmad dalam Al-Musnad,13759.
Ya…………. Dengan adzan juga dzikir dan bukan dengan berbagai talbis tenaga dalam/ tenaga metafisika untuk mengusir jin ghailan tersebut. Celakalah jika kita tidak mengikuti petunjuk Rasulullah malah menggunakan TD/TM sebab selain kita telah berbuat syirik kita malah dapat saja celaka karena dibinasakan jin ghailan atau malah menjadikan kita temannya tanpa kita sadari………………
Kamis, 23 Mei 2013

NTH in RouterOS before and after 3.x

Nth in RouterOS 2.9 and below.

example: nth=Every,Counter,Packet nth=2,3,0. 2,3,1 2,3,2
divide all packets into groups of three (2+1). The packets will be numbered from 0 to 2. So, a sequence of packets the rule matches looks like: (0 1 2)(0 1 2)(0 1 2)(0 1 2)(0 1 2)...
the first rule will match the first packet in each group ("Packet"=0). The second rule will match the second packet in each group ("Packet"=1) and so on. Each successful match increments the counter. When a value of "Every" is reached, the counter is reset to 0. For this to work, the "Counter" should be the same for all rules (you can pick any value from 0 to 15, IIRC).


In v3.0 it is a little different implementation of NTH. It has only two parameters 'every' and 'packet'.

How it works in v3.0 and above

Every rule has its own counter. When rule receives packet counter for current rule is increased by one. If counter matches value of 'every' packet will be matched and counter will be set to zero.
If passthrough is not set then packets will be marked as follows:
  • first rule nth=2,1 rule will match every first packet of 2, hence, 50% of all the traffic that is matched by the rules
  • second rule if passthrough=no will match ONLY 25% of traffic because in 3.0 you need only one rule to catch traffic not like 2.9

Example

Now it is possible to match 50% of all traffic only with one rule:
/ip firewall mangle
add action=mark-packet chain=prerouting new-packet-mark=AAA nth=2,1;
If more than one rule is needed, then there are two ways to match packets:
  • first rule sees all packets and matches 1/3 of all, second rule sees 2/3 of packets and matches 1/2, third rule sees and matches all packets that passed through first two rules ( 1/3 of all packets ).
/ip firewall mangle 
add action=mark-packet chain=prerouting new-packet-mark=AAA nth=3,1 passthrough=no;
add action=mark-packet chain=prerouting new-packet-mark=BBB nth=2,1 passthrough=no;
add action=mark-packet chain=prerouting new-packet-mark=CCC ;
  • all rules can see all packets and each rule matches every 3-rd packet.
/ip firewall mangle 
add action=mark-packet chain=prerouting new-packet-mark=AAA nth=3,1 passthrough=yes;
add action=mark-packet chain=prerouting new-packet-mark=BBB nth=3,2 passthrough=yes;
add action=mark-packet chain=prerouting new-packet-mark=CCC nth=3,3 passthrough=yes; 
 
 
source: http://wiki.mikrotik.com/wiki/Manual:NTH_in_RouterOS_3.x 

Per-Traffic Load Balancing

Introduction

Bandwidth management is an essential part of every day operation for typical ISP's, business, and even everyday home users. There are many different types of management tools available to RouterOS users, QoS, rate-limiting, packet-limiting, to name few
I personally operate a wireless ISP in an area that has no other type of conventional high-speed internet conection (ie. cable, fibre or DSL). Not having access to fibre myself, I am in a situation where the single fastest backbone connection I can get does not provide enough bandwidth for me to have only one connection. As a result of this limitation load-balancing multiple internet backbone connections is very important.
In the past I have used ECMP, persistent per connection styled load-balancing (see Routing), as well as various other methods. However, I found all of then lacking in various different areas (not load-balancing correctly, broken large HTTP downloads, IM problems, to name a few issues). I then investigated a way to give me more control over my bandwidth while minimizing the potential problems. The end result was a per-traffic type of load-balancing. This tutorial is designed address that one specific area in depth, at a later date, I may expand/add additional info on fail-over, and other topics

Functions of RouterOS used

  • Firewall mangle rules
  • Firewall address-lists
  • Routing

Step 1 - How to break up to traffic

Before you even log onto your RouterOS box, you should have an idea of how you want to divide your traffic, and have an understanding of what traffic can and what traffic can't be broken up.
Here is an example of what you may want to attempt to separate (in no particular order)
  • HTTP traffic (port 80)
  • SSL traffic (port 443)
  • POP3 traffic (port 110)
  • SMTP traffic (port 25)
  • P2P traffic (various port)
  • Unknown traffic (various port)
After making a list of the traffic type, and the ports they operate on, you need to look at the list and decide if it is at all even capable of being forced out a certain internet connection.
Using the above list as an example here is what I came up with
  • HTTP traffic (no problems found yet)
  • SSL traffic (some issues, for normal SSL websites and 90% of all software it is not a problem, I'll explain why issues can arise later)
  • POP3 traffic (no problems found yet)
  • SMTP traffic (no problems found yet)
  • P2P traffic (must go out same internet connection as Unknown Traffic, I'll explain why this is later)
  • Unknown traffic (must go out same internet connection as P2P traffic, I'll explain why this is later)
Now for a quick explanation of why there can be some issues depending on the traffic type. Some websites/programs do not play friendly with multiple requests from different IP addresses, this is the reason why ECMP has so many problems. I will provide a simple solution to the rare conditions where load-balancing can't be completed.
Again using the above as an example lets explain where and why issues can be arise. SSL - The beauty of a website is that are separate requests for different data, ie. loading pictures from 3 different sources would be a request to each respective server. The result is if a we have a website that uses both SSL and HTTP traffic we know that in most cases the website will just answer the request without care of the originating IP address. However, and this is a special case, if the website/program developer checks where the requests are originating and they find that the IP are different, they may not succesfully answer those requests (this can be by design or by accident). I had 2 cases of this, in both cases it was secured medical websites that where using it as a method of protecting their data.
P2P and Unknown - I am addressing these together because the issue is one and the same. RouterOS doesn't identify P2P based on any single condition, but instead analyzes the packets! This means RouterOS needs time to watch the data before it realizes that is in fact P2P traffic. As a result RouterOS doesn't know the data is P2P until AFTER the connection is made. This is important because the only way to send data out a specific internet connection you must know that traffic is BEFORE the connection is made. So as with P2P traffic, unknown traffic is just that, it is unknown. By marking the unknown traffic though you can control what internet connection is used for both P2P and the left over unknown traffic (very useful!)

Step 2 - Setting Up the Network

Before we get to the real point of this tutorial we need a fictious network we can use as an example.
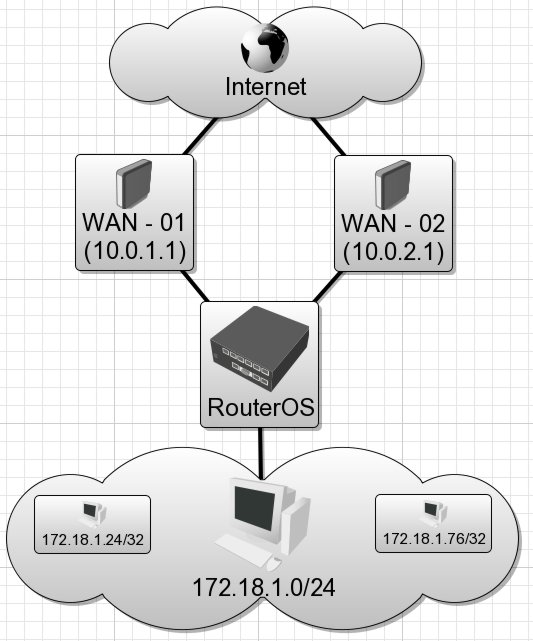
  • client computers (172.18.1.0/24)
  • Internet Gateways (10.0.1.1/24, 10 0.2.1/24)
  • RouterOS IPs (10.0.1.2/24, 10.0.2.2/24)
Network Map
Asuming that the IPs, default routes, and DNS settings are already in place the following allow users to get internet access.
Create Address-List for permitted use of internet
/ ip firewall address-list
add list="Allowed-Internet" address=172.18.1.0/24 comment="" disabled=no
Create Address-List to bypass load-balancing
/ ip firewall address-list
add list="WAN-01" address=172.18.1.24/32 comment="" disabled=no
add list="WAN-02" address=172.18.1.76/32 comment="" disabled=no
Apply 'Masquerading'to the traffic leaving the WAN interfaces
/ ip firewall nat 
add chain=srcnat action=masquerade out-interface="WAN - 01" src-address-list="Allowed-Internet" comment="Gateway 10.0.1.1/24" disabled=no 
add chain=srcnat action=masquerade out-interface="WAN - 02" src-address-list="Allowed-Internet" comment="Gateway 10.0.2.1/24" disabled=no
Clients should be able to browse the internet, however only one internet connection would be used (the current default route in RouterOS)

Step 3 - Using RouterOS's Mangle Tool to mark specific traffic

The following is the necessary RouterOS commands to mark specific traffic for a specific route. We will use the same example traffic types as in the beginning,i.e. HTTP, SSL, POP3, SMTP, P2P, and Unknown
/ ip firewall mangle 
add chain=prerouting action=mark-routing new-routing-mark="WAN-01" src-address-list="WAN-01" passthrough=no comment="" disabled=no 
add chain=prerouting action=mark-routing new-routing-mark="WAN-02" src-address-list="WAN-02" passthrough=no comment="" disabled=no 
add chain=prerouting action=mark-routing new-routing-mark="HTTP traffic" passthrough=no dst-port=80 protocol=tcp comment="" disabled=no 
add chain=prerouting action=mark-routing new-routing-mark="SSL traffic" passthrough=no dst-port=443 protocol=tcp comment="" disabled=no 
add chain=prerouting action=mark-routing new-routing-mark="POP3 traffic" passthrough=no dst-port=110 protocol=tcp comment="" disabled=no 
add chain=prerouting action=mark-routing new-routing-mark="SMTP traffic" passthrough=no dst-port=25 protocol=tcp comment="" disabled=no 
add chain=prerouting action=mark-routing new-routing-mark="P2P traffic" passthrough=no p2p=all-p2p comment="" disabled=no 
add chain=prerouting action=mark-routing new-routing-mark="Unknown traffic" passthrough=no comment="" disabled=no 
The first two lines provide a method of marking certain clients to bypass the load-balancing and use only a specific internet connection for all of their traffic.
The next lines then will mark traffic based on the dst-port, notice how we are not passing through, also notice that we are marking all traffic, even if not known and that there is always a different internet connection to be specified for the Unknown and P2P instead of using the router's default route. I also mark P2P separate, even though it must go out the same internet connection as Unknown traffic.
I do this for a couple of reasons, one is that I could easily stop all traffic by simply disabling a route, and the other is in my RouterOS configuration I use a lot of QoS, it's very easy to remember how everything is configured if the QoS mirrors the load-balancing.
So now that we are marking traffic for their respective routes, we next have to add those actual routes.

Step 4 - Using the routing functions of RouterOS to force traffic out to certain internet connections

This following is the necessary RouterOS commands to provide routes for the marked HTTP, SSL, POP3, SMTP, P2P, and Unknown Traffic
/ ip route 
add dst-address=0.0.0.0/0 gateway=10.0.1.1 scope=255 target-scope=10 routing-mark="WAN - 01" comment="" disabled=no
add dst-address=0.0.0.0/0 gateway=10.0.2.1 scope=255 target-scope=10 routing-mark="WAN - 02" comment="" disabled=no
add dst-address=0.0.0.0/0 gateway=10.0.2.1 scope=255 target-scope=10 routing-mark="HTTP traffic" comment="" disabled=no 
add dst-address=0.0.0.0/0 gateway=10.0.2.1 scope=255 target-scope=10 routing-mark="SSL traffic" comment="" disabled=no 
add dst-address=0.0.0.0/0 gateway=10.0.2.1 scope=255 target-scope=10 routing-mark="POP3 traffic" comment="" disabled=no 
add dst-address=0.0.0.0/0 gateway=10.0.1.1 scope=255 target-scope=10 routing-mark="SMTP traffic" comment="" disabled=no 
add dst-address=0.0.0.0/0 gateway=10.0.1.1 scope=255 target-scope=10 routing-mark="P2P traffic" comment="" disabled=no 
add dst-address=0.0.0.0/0 gateway=10.0.1.1 scope=255 target-scope=10 routing-mark="Unknown traffic" comment="" disabled=no
The first two lines provide the routes necessary to give the clients that are not being load-balanced via traffic type the correct gateway to the internet. The remaining lines are the routes necessary to provide the appropiate gateway based on traffic type

Step 5 - Review what you've created

What did you do: * You intelligently broke up your internet traffic into different types * Your marked that traffic using the Mangle Tool of RouterOS * You created a bypass list to allow certain IP to bypass the Per-Traffic Load-Balancing * You assigned particular routes based on the traffic you marked with Mangle

Conclusion

What you have done is very powerful and this tutorial provides just the tip of the iceberg so to say. The traffic types I have listed here are only a small amout of the total and you may want to add many others (ie. DNS, Terminal Services, ICMP, etc). This can be used is a great deal of different ways be it in a small offfice enviroment (separating your email usage from your browsing) or a large wireless ISP (for load-balancing). Some tips and final thougths
1. Think though what you want to achieve before you start 2. Pay attention to the traffic of type on each line (is it incoming intensive or outgoing intensive) 3. Finally experiment, nothing better then finding better, faster, and more intelligent ways to improve your services with a little capital costs

source: http://wiki.mikrotik.com/wiki/Per-Traffic_Load_Balancing

Mikrotik Transparent Bridge between two routers


Lets suppose that we want to connect two seperate offices to one single LAN. where both offices have a
internet connection
to achive this we will be doing a EoIP tunnel inside PPTP connecton
EoIP is a Mikrotik specific method of bridging ethernet traffic over a routed network
The problem with using EoIP as a “VPN”, is that it is not encrypted. so we will be using a encrypted
pptp tunnel to get over this.
Note that the private ip range will be same on both sides. This is not important for the tunnel to work, but one of the purposes of EoIP is to bridge networks in this way. It should, also,
be noted that a DHCP server on either end of the tunnel will be “seen” by equipment at both
ends of the tunnel.
First we will first build the PPtP tunnel. We will set the left router (10.1.1.1) as the PPtP server and the right
router (10.2.2.2) as the client.
Left router:
/interface pptp-server server set enabled=yes
/ppp secret
add name=”USERNAME” service=pptp password=”PASS” \
local-address=192.168.10.1 remote-address=192.168.10.2  \
disabled=no
The above configuration is all that is needed on the left router.
It should be noted that the IP range I chose for the tunnel is NOT
in the same range as the LAN segments. This is not strictly needed,
but it is good network design, since these interfaces will NOT be added to the bridge.
Right Router:
/interface pptp-client
add name=”pptp-tunnel1″ connect-to=10.1.1.1 \
user=”USERNAME” password=”PASS” \
profile=default-encryption add-default-route=no \
disabled=no
This is the full configuration needed for the tunnel on the right router. The profile section is a default setting,
but I generally specify it anyway.
The PPtP tunnel is now set up and you should see the tunnel as running
on both ends. You can see the tunnel interface in Winbox under “Interfaces” and “PPP->Interfaces”.
If you wish the see the IP addresses, you can see that under “IP->Addresses”.
Now we need to add the EoIP tunnel. This is the same on both ends,
with the exception of the IP address we are connecting to
LEFT:
/interface eoip add name=eoiptunnel remote-address=192.168.10.2 \
tunnel-id=101 disabled=no
RIGHT:
/interface eoip add name=eoiptunnel remote-address=192.168.10.1 \
tunnel-id=101 disabled=no
It is very important that the tunnel-id parameter be the same on both ends.
Next, we will add the bridge (this is the same on both ends):
/interface bridge add name=bridge1
Hard to believe it’s that easy, but it is.
Next, we set up the bridge ports. We will assume that the LAN side of the Mikrotik routers are the ether2 interface.
/interface bridge port add bridge=bridge1 interface=ether2
/interface bridge port add bridge=bridge1 interface=eoiptunnel
The name eoiptunnel is the “name” parameter we used in the configuration we did above for the tunnel setup.
Devices on the right router should use 192.168.1.254 as their default gateway. They will be able
to see the 192.168.1.1, but if you use that as a default gateway for these devices, then ALL their traffic
will go across the bridge. This may be your desire, but it is important to note this fact.
(Reverse the above for devices on the left router.)
I’ve already mentioned the DHCP server. Note that IP addresses cannot be duplicated on either network.
The EoIP tunnel will act just like a (very long) ethernet cable plugged into a switch at both ends of the tunnel.
You are, literally, joining the 2 networks into ONE network.


source: http://fatalsite.net/?p=106

Selasa, 21 Mei 2013

Cara Meningkatkan Kecepatan Browser Firefox

Cara Meningkatkan Kecepatan Browser Firefox

Untuk meningkatkan kemampuan browser Firefox, dibutuhkan sedikit pengaturan settingan tambahan. Berikut ini tips untuk menggandakan kecepatan browser Mozilla Firefox anda :

1. Aktifkan browser Firefox Anda dan ketikkan perintah “about:config” (tanpa tanda kutip), di address barnya.

2. Anda akan dibawa ke halaman konfigurasi Firefox. Kalau ada peringatan untuk hati-hati mengubah pengaturan pada halaman tersebut, klik yes atau ok saja.

3. Pada filter search bar di halaman konfigurasi, ketikkan “network.http.pipelining“. Pastikan valuenya sudah diset dengan nilai “true”. Jika masih “false”, klik ganda untuk menjadikannya “true”.

4. Kembali ke filter search bar, ketikkan “network.http.pipelining.maxrequests“. Double klik pada opsi ini dan rubah nilainya (value) menjadi 20.

5. Kembali ke filter search bar, ketikkan “network.http.proxy.pipelining“, double klik untuk merubah valuenya menjadi ‘true’.

6. Kembali ke filter search bar, ketikkan “network.dns.disableIPv6“. Double klik untuk merubah nilainya menjadi ‘true’.

7. Klik kanan di halaman konfigurasi tersebut dimanapun terserah, pilih new –>boolean. Ketikkan “content.interrupt.parsing“pada popup windows yang muncul kemudian klik OK. Ketika prompt untuk pilihan muncul, pilih ‘true’.

8. Kembali klik kanan halaman konfigurasi, pilih new –> integer. Ketikkan “content.max.tokenizing.time“. Pada prompt value yang muncul masukkan nilai 2250000.

9. Kembali klik kanan halaman konfigurasi, pilih new –> integer. Ketikkan “content.notify.interval“. Masukkan nilai 750000 pada prompt value yang muncul.

10. Kembali klik kanan halaman konfigurasi, pilih new –> boolean. Ketikkan “content.notify.ontimer“. Pilih ‘true’ untuk isian prompt value yang muncul.

11. Kembali klik kanan halaman konfigurasi, pilih new –> integer. Ketikkan “content.notify.backoffcount“. Pada prompt value yang muncul isikan value ‘5′.

12. Kembali klik kanan halaman konfigurasi, pilih new –> integer. Ketikkan “content.switch.threshold“. Isikan nilai 750000 pada prompt integer value yang muncul.

13. Terakhir, kembali klik kanan pada halaman konfigurasi, pilih new –>integer. Ketikkan “nglayout.initialpaint.delay“. Isikan nilai ‘0′ pada prompt isian nilai yang muncul.

JANGAN LUPA UNTUK MERESTART FIREFOX NYA

Langsung saja dipraktekkan dan rasakan kemampuan & kecepatan Firefox milik Anda meningkat dua kali lipat dibanding settingan defaultnya.

Kamis, 16 Mei 2013

MikroTik First time startup


Overview

After you have installed the RouterOS software, or turned on the Router for the first time, there are various ways how to connect to it:
  • Accessing Command Line Interface (CLI) via Telnet, ssh, serial cable or even keyboard and monitor if router has VGA card.
  • Accessing Web based GUI (WebFig)
  • Using WinBox configuration utility
Every router is factory pre-configured with IP address 192.168.88.1/24 on ether1 port. Default username is adminwith empty password.
Additional configuration may be set depending on RouterBoard model. For example, RB750 ether1 is configured as WAN port and any communication with the router through that port is not possible. List of RouterBOARD models and their default configurations can be found in this article.

Winbox

Winbox is configuration utility that can connect to the router via MAC or IP protocol. Latest winbox version can be downloaded from our demo router.
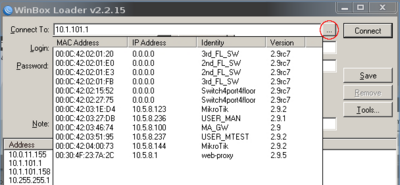
Run Winbox utility, then click the [...] button and see if Winbox finds your Router and it's MAC address. Winbox neighbor discovery will discover all routers on the broadcast network. If you see routers on the list, connect to it by clicking on MAC address and pressing Connect button.Winbox-loader2.png
Winbox will try download plugins from the router, if it is connecting for the first time to the router with current version. Note that it may take about one minute to download all plugins if winbox is connected with MAC protocol.
This method works with any device that runs RouterOS. Your PC needs to have MTU 1500
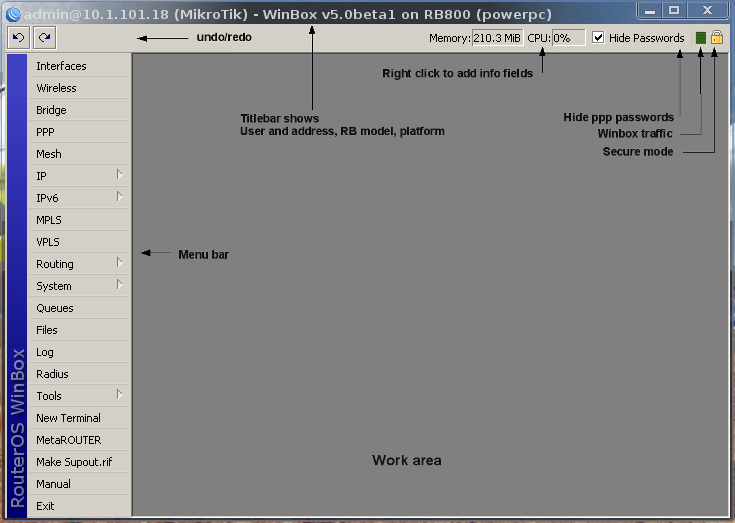
After winbox have successfully downloaded plugins and authenticated, main window will be displayed:Winbox-workarea.png
If winbox cannot find any routers, make sure that your Windows computer is directly connected to the router with an Ethernet cable, or at least they both are connected to the same switch. As MAC connection works on Layer2, it is possible to connect to the router even without IP address configuration. Due to the use of broadcasting MAC connection is not stable enough to use continuously, therefore it is not wise to use it on a real production / live network!. MAC connection should be used only for initial configuration.

Follow winbox manual for more information.

WebFig

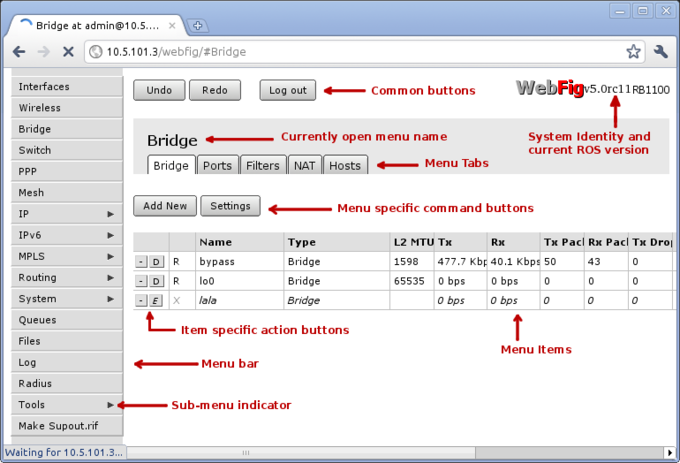
If you have router with default configuration, then IP address of the router can be used to connect to the Web interface. WebFig has almost the same configuration functionality as Winbox.
Webfig-2.png
Please see following articles to learn more about web interface configuration:

CLI

Command Line Interface (CLI) allows configuration of the router's settings using text commands. Since there is a lot of available commands, they are split into groups organized in a way of hierarchical menu levels. Follow console manual for CLI syntax and commands.
There are several ways how to access CLI:
  • winbox terminal
  • telnet
  • ssh
  • serial cable etc.

Serial Cable

If your device has a Serial port, you can use a console cable (or Null modem cable)
Null modem cable
Plug one end of the serial cable into the console port (also known as a serial port or DB9 RS232C asynchronous serial port) of the RouterBOARD and the other end in your PC (which hopefully runs Windows or Linux). You can also use a USB-Serial adapter. Run a terminal program (HyperTerminal, or Putty on Windows) with the following parameters for All RouterBOARD models except 230:
115200bit/s, 8 data bits, 1 stop bit, no parity, flow control=none by default.
RouterBOARD 230 parameters are:
9600bit/s, 8 data bits, 1 stop bit, no parity, hardware (RTS/CTS) flow control by default.
First, Open Windows Hyperterminal (Hypertrm.exe) as follow:
Click Cancel and then click properties button.
Click Configure button and set COM Properties as follow:
Apply and Click OK.
At First, you will see blank windows as follow:
Press Enter and terminal is ready to process commands.
If parameters are set correctly you should be able to see login prompt. Now you can access router by entering username and password:
MikroTik 4.15
MikroTik Login: 

  MMM      MMM       KKK                          TTTTTTTTTTT      KKK
  MMMM    MMMM       KKK                          TTTTTTTTTTT      KKK
  MMM MMMM MMM  III  KKK  KKK  RRRRRR     OOOOOO      TTT     III  KKK  KKK
  MMM  MM  MMM  III  KKKKK     RRR  RRR  OOO  OOO     TTT     III  KKKKK
  MMM      MMM  III  KKK KKK   RRRRRR    OOO  OOO     TTT     III  KKK KKK
  MMM      MMM  III  KKK  KKK  RRR  RRR   OOOOOO      TTT     III  KKK  KKK

  MikroTik RouterOS 4.15 (c) 1999-2010       http://www.mikrotik.com/


[admin@MikroTik] > 

Detailed description of CLI login is in login process section.

Monitor and Keyboard

If your device has a graphics card (ie. regular PC) simply attach a monitor to the video card connector of the computer(note: RouterBOARD products don't have this, so use Method 1 or 2) and see what happens on the screen. You should see a login promt like this:
MikroTik v3.16
Login:

Enter admin as the login name, and hit enter twice (because there is no password yet), you will see this screen:
  MMM      MMM       KKK                          TTTTTTTTTTT      KKK
  MMMM    MMMM       KKK                          TTTTTTTTTTT      KKK
  MMM MMMM MMM  III  KKK  KKK  RRRRRR     OOOOOO      TTT     III  KKK  KKK
  MMM  MM  MMM  III  KKKKK     RRR  RRR  OOO  OOO     TTT     III  KKKKK
  MMM      MMM  III  KKK KKK   RRRRRR    OOO  OOO     TTT     III  KKK KKK
  MMM      MMM  III  KKK  KKK  RRR  RRR   OOOOOO      TTT     III  KKK  KKK 

  MikroTik RouterOS 3.16 (c) 2008       http://www.mikrotik.com/


Terminal ansi detected, using single line input mode
[admin@router] >
Now you can start configuring the router, by issuing the setup command.
This method works with any device that has a video card and keyboard connector

Rabu, 15 Mei 2013

Membuat Mangle pada Mikrotik menggunakan Iterasi Script


Sebagai contoh, kita akan membuat mangle untuk IP address : 172.17.144.5 s/d 172.17.144.254, bayangkan kalo dibuat manual, bisa dipastikan jari tangan jadi kayak jari kaki :)

Ok, langsung aja, scriptnya kira-kira kayak gini:

:for z from 5 to 254 do={/ip firewall mangle add action=mark-packet chain=forward c
omment="" disabled=no dst-address="172.17.144.$z" in-interface=WAN new-packet-mark="PC144.$z" passthrough=yes  protocol=tcp src-address="172.17.140.4" src-port=808}

semoga bermanfaat.

Minggu, 05 Mei 2013

The Best Subtitle Place for Movies & TV Shows

Hi guys, here are the best Place for Movies & TV Shows Subtitle

Subscene


Addic7ed

Jumat, 03 Mei 2013

Membuat Address List pada Mikrotik dengan Script

Sebagai contoh, kita akan membuat address list pada menu IP-Firewall dengan nama "Client144" yang isinya adalah nomor IP dari 172.17.144.5 s/d 254, maka instruksi pada script yang kita ketik pada New Terminal adalah sbb:


[admin@MikroTik] >  :for z from 5 to 254 do={/ip firewall address-list add addres
s="172.17.144.$z" disabled=no list="Client144"}

Smoga bermanfaat.

Cek Port yang terbuka pada IP Eksternal IP anda

Untuk mengetahui port-port apa saja yang terbuka pada Public IP yang kita miliki, anda bisa mengeceknya menggunakan Tool online YouGetSinal.com


Smoga bermanfaat.


Download 92 Al-Qur'an Reciter dalam bentuk MP3

Assalamu'alaikum wr.wb.

Buat yang mau download murrotal Al-Qur'an MP3 dengan kualitas lumayan bagus dan bisa milih dari 92 Reciter, silahkan klik link berikut:

The Holy Quran

Smoga bermanfaat. 

Wassalam.

Rabu, 01 Mei 2013

Best Subtitle Editor


SubMagic is a tool to convert, edit, translate, synchonize or create movie subtitles. It supports several subtitle formats, has a lot of features and functions, is easy to operate and best of all... it's free! SubMagic is written in C++ using Microsoft Visual Studio 2008 and doesn't need a .NET framework or any other external libraries. DirectX 9.0c is needed for video playback. SubMagic is available in English and (partly translated) in Dutch.