Senin, 29 April 2013

How to Export Specific Mikrotik Router Configuration Script


If you want to export specific Mikrotik Router configuration only like Filter Rules, NAT, Mangle etc, you can use commend Export for example: In this case you want to export Mangle configuration under IP-> Firewall then:


1. Login to Winbox
2. Go to New Terminal
3. Then type ip firewall mangle export

You can copy the result and paste to other Mikrotik Router board and the configuration will exactly heve the same configuration.
You can also use the command Export to other menu in Mikrotik

Good Luck!

Kontrol Bandwidth LAN & WAN pada Mikrotik

Apabila kita menggunakan Routerboard untuk koneksi Ethernet lebih dari 2 (WAN, LAN1, LAN2 & DMZ) dan kita ingin membatasi hanya koneksi internet nya saja, sementara Bandwidth untuk LAN & DMZ tetap unlimited, maka ini yang harus dibuat:


Contoh kasus:

Sebuah Routerboard digunakan untuk me-routing 4 macam network sebagai berikut:

/ip address
add address=202.182.189.27/28 broadcast=202.182.189.31 comment="default \
    configuration" disabled=no interface=WAN network=202.182.189.16
add address=172.17.142.20/23 broadcast=172.17.143.255 comment="added by \
    setup" disabled=no interface=LAN2 network=172.17.142.0
add address=172.17.140.1/24 broadcast=172.17.140.255 comment="added by setup" \
    disabled=no interface=DMZ network=172.17.140.0
add address=172.17.144.2/24 broadcast=172.17.144.255 comment="" disabled=no \
    interface=LAN1 network=172.17.144.0


Buat NAT sbb:

/ip firewall nat
add action=src-nat chain=srcnat comment="" disabled=no out-interface=LAN1 \
    src-address=172.17.140.0/24 to-addresses=172.17.144.2 to-ports=0-65535
add action=src-nat chain=srcnat comment="" disabled=no out-interface=LAN2 \
    src-address=172.17.140.0/24 to-addresses=172.17.142.20 to-ports=0-65535
add action=src-nat chain=srcnat comment="" disabled=no out-interface=DMZ \
    src-address=172.17.142.0/23 to-addresses=172.17.140.1 to-ports=0-65535
add action=src-nat chain=srcnat comment="" disabled=no out-interface=LAN1 \
    src-address=172.17.142.0/23 to-addresses=172.17.144.2 to-ports=0-65535
add action=src-nat chain=srcnat comment="" disabled=no out-interface=DMZ \
    src-address=172.17.144.0/24 to-addresses=172.17.140.1 to-ports=0-65535
add action=src-nat chain=srcnat comment="" disabled=no out-interface=LAN2 \
    src-address=172.17.144.0/24 to-addresses=172.17.142.20 to-ports=0-65535
add action=src-nat chain=srcnat comment="" disabled=no out-interface=WAN \
    src-address=172.17.140.0/24 to-addresses=202.182.189.27 to-ports=0-65535
add action=src-nat chain=srcnat comment="" disabled=no out-interface=WAN \
    src-address=172.17.142.0/23 to-addresses=202.182.189.27 to-ports=0-65535
add action=src-nat chain=srcnat comment="" disabled=no out-interface=WAN \
    src-address=172.17.144.0/24 to-addresses=202.182.189.27 to-ports=0-65535

Sengaja tidak menggunakan Masqurede agar mudah memblok koneksi internet ke salah satu Network Segment.

Lalu kita ingin membatasi hanya Bandwidth Internet saja (tidak termasuk bandwidth LAN) dimana kecepatan Internet upload=128kbit & download=256kbit, tetapi khusus client dengan IP address 172.17.144.166 (user client yang bernama Istakhry) memiliki unlimited internet bandwidth. Sementara kecepatan bandwidth antar LAN & DMZ tidak dibatasi, maka settingnya seperti ini:


1. Buat mangle untuk menandai paket data yang melintas di jaringan sbb:


/ip firewall mangle
add action=mark-packet chain=forward comment="" disabled=no in-interface=LAN1 \
    new-packet-mark=LAN1_LAN2 out-interface=LAN2 passthrough=yes
add action=mark-packet chain=forward comment="" disabled=no in-interface=LAN1 \
    new-packet-mark=LAN1_DMZ out-interface=DMZ passthrough=yes
add action=mark-packet chain=forward comment="" disabled=no in-interface=LAN1 \
    new-packet-mark=LAN1_WAN out-interface=WAN passthrough=yes
add action=mark-packet chain=forward comment="" disabled=no in-interface=LAN2 \
    new-packet-mark=LAN2_DMZ out-interface=DMZ passthrough=yes
add action=mark-packet chain=forward comment="" disabled=no in-interface=LAN2 \
    new-packet-mark=LAN2_WAN out-interface=WAN passthrough=yes
add action=mark-packet chain=forward comment="" disabled=no in-interface=LAN2 \
    new-packet-mark=LAN2_LAN1 out-interface=LAN1 passthrough=yes
add action=mark-packet chain=forward comment="" disabled=no in-interface=DMZ \
    new-packet-mark=DMZ_LAN1 out-interface=LAN1 passthrough=yes
add action=mark-packet chain=forward comment="" disabled=no in-interface=DMZ \
    new-packet-mark=DMZ_LAN2 out-interface=LAN2 passthrough=yes
add action=mark-packet chain=forward comment="" disabled=no in-interface=DMZ \
    new-packet-mark=DMZ_WAN out-interface=WAN passthrough=yes
add action=mark-packet chain=forward comment="" disabled=no in-interface=WAN \
    new-packet-mark=WAN_LAN1 out-interface=LAN1 passthrough=yes
add action=mark-packet chain=forward comment="" disabled=no in-interface=WAN \
    new-packet-mark=WAN_LAN2 out-interface=LAN2 passthrough=yes
add action=mark-packet chain=forward comment="" disabled=no in-interface=WAN \
    new-packet-mark=WAN_DMZ out-interface=DMZ passthrough=yes
add action=mark-packet chain=forward comment="" disabled=no \
    dst-address=172.17.144.166 in-interface=WAN new-packet-mark=Istakhry \
    passthrough=yes


2. Setting Queue Type sbb:

/queue type
add kind=pcq name="PCQ_download" pcq-classifier=dst-address pcq-limit=50 \
    pcq-rate=256000 pcq-total-limit=2000
add kind=pcq name="PCQ_upload" pcq-classifier=src-address pcq-limit=50 \
    pcq-rate=128000 pcq-total-limit=2000

3. Setting Queue Tree sbb:

/queue tree
add burst-limit=0 burst-threshold=0 burst-time=0s disabled=no limit-at=0 \
    max-limit=0 name="queue1" packet-mark=LAN1_LAN2 parent=global-out \
    priority=8 queue=default
add burst-limit=0 burst-threshold=0 burst-time=0s disabled=no limit-at=0 \
    max-limit=0 name="queue2" packet-mark=LAN2_LAN1 parent=global-out \
    priority=8 queue=default
add burst-limit=0 burst-threshold=0 burst-time=0s disabled=no limit-at=0 \
    max-limit=0 name="queue3" packet-mark=LAN1_DMZ parent=global-out \
    priority=8 queue=default
add burst-limit=0 burst-threshold=0 burst-time=0s disabled=no limit-at=0 \
    max-limit=0 name="queue4" packet-mark=LAN1_WAN parent=global-out \
    priority=8 queue=PCQ_upload
add burst-limit=0 burst-threshold=0 burst-time=0s disabled=no limit-at=0 \
    max-limit=0 name="queue5" packet-mark=LAN2_DMZ parent=global-out \
    priority=8 queue=default
add burst-limit=0 burst-threshold=0 burst-time=0s disabled=no limit-at=0 \
    max-limit=0 name="queue6" packet-mark=LAN2_WAN parent=global-out \
    priority=8 queue=PCQ_upload
add burst-limit=0 burst-threshold=0 burst-time=0s disabled=no limit-at=0 \
    max-limit=0 name="queue7" packet-mark=DMZ_LAN1 parent=global-out \
    priority=8 queue=default
add burst-limit=0 burst-threshold=0 burst-time=0s disabled=no limit-at=0 \
    max-limit=0 name="queue8" packet-mark=DMZ_LAN2 parent=global-out \
    priority=8 queue=default
add burst-limit=0 burst-threshold=0 burst-time=0s disabled=no limit-at=0 \
    max-limit=0 name="queue9" packet-mark=DMZ_WAN parent=global-out \
    priority=8 queue=PCQ_upload
add burst-limit=0 burst-threshold=0 burst-time=0s disabled=no limit-at=0 \
    max-limit=0 name="queue10" packet-mark=WAN_LAN1 parent=global-out \
    priority=8 queue=PCQ_download
add burst-limit=0 burst-threshold=0 burst-time=0s disabled=no limit-at=0 \
    max-limit=0 name="queue11" packet-mark=WAN_LAN2 parent=global-out \
    priority=8 queue=PCQ_download
add burst-limit=0 burst-threshold=0 burst-time=0s disabled=no limit-at=0 \
    max-limit=0 name="queue12" packet-mark=WAN_DMZ parent=global-out \
    priority=8 queue=PCQ_download
add burst-limit=0 burst-threshold=0 burst-time=0s disabled=no limit-at=0 \
    max-limit=0 name="queue13" packet-mark=Istakhry parent=global-out \
    priority=8 queue=default


Nah selesai sudah.....smoga membantu.

Jumat, 26 April 2013

Mikrotik PCQ (Per Connection Queue)

Per Connection Queue (PCQ) is a queuing discipline that can be used to dynamically equalize or shape traffic for multiple users, using little administration. It is possible to divide PCQ scenarios into three major groups: equal bandwidth for a number of users, certain bandwidth equal distribution between users, unknown bandwidth equal distribution between users.

Equal Bandwidth for a Number of Users

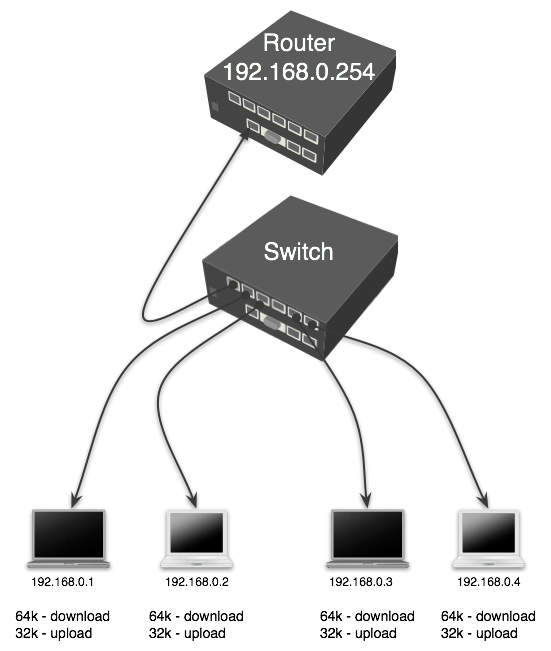
Use PCQ type queue when you need to equalize the bandwidth [and set max limit] for a number of users. We will set the 64kbps download and 32kbps upload limits.
PCQ.png
There are two ways how to make this: using mangle and queue trees, or, using simple queues.
1. Mark all packets with packet-marks upload/download: (lets constider that ether1-LAN is public interface to the Internet and ether2-LAN is local interface where clients are connected
/ip firewall mangle add chain=prerouting action=mark-packet \
   in-interface=ether1-LAN new-packet-mark=client_upload
/ip firewall mangle add chain=prerouting action=mark-packet \
   in-interface=ether2-WAN new-packet-mark=client_download
2. Setup two PCQ queue types - one for download and one for upload. dst-address is classifier for user's download traffic, src-address for upload traffic:
/queue type add name="PCQ_download" kind=pcq pcq-rate=64000 pcq-classifier=dst-address
/queue type add name="PCQ_upload" kind=pcq pcq-rate=32000 pcq-classifier=src-address

3. Finally, two queue rules are required, one for download and one for upload:
/queue tree add parent=global-in queue=PCQ_download packet-mark=client_download
/queue tree add parent=global-out queue=PCQ_upload packet-mark=client_upload
If you don't like using mangle and queue trees, you can skip step 1, do step 2, and step 3 would be to create one simple queue as shown here:
/queue simple add target-addresses=192.168.0.0/24 queue=PCQ_upload/PCQ_download \
   packet-marks=client_download,client_upload
 
sample to create client using script:
 
:for z from 5 to 254 do={/queue simple add name="Client-172.17.144.$z" \
target-addresses="172.17.144.$z" parent="LAN1" queue=PCQ_upload/PCQ_download \
packet-marks=client_download,client_upload}
 

Selasa, 23 April 2013

The Difference Between Straight Through & Crossover

There are generally three main types of networking cables: straight-through, crossover, and rollover cables. Each cable type has a distinct use, and should not be used in place of another. So how do you know which cable to use for what you need?

The Purpose of Straight-Through Cables

Straight-through cables get their name from how they are made. Out of the 8 pins that exist on both ends of an Ethernet cable, each pin connects to the same pin on the opposite side. Review the diagram below for a visual example:
straight through cables
Notice how each wire corresponds to the same pin. This kind of wiring diagram is part of the 568A standard. The 568B standard achieves the same thing, but through different wiring. It is generally accepted to use the 568A standard as pictured, since it allows compatibility with certain telephone hardware- while 568B doesn’t.
Straight-through cables are primarily used for connecting unlike devices. A straight-through cable is typically used in the following situations:
Use a straight-through cable when:

  • 1. Connecting a router to a hub
  • 2. Connecting a computer to a swtich
  • 3. Connecting a LAN port to a switch, hub, or computer

Note that some devices such as routers will have advanced circuitry, which enables them to use both crossover and straight-through cables. In general, however, straight-through cables will not connect a computer and router because they are not “unlike devices.”

The Purpose of Crossover Cables

Crossover cables are very similar to straight-through cables, except that they have pairs of wires that crisscross. This allows for two devices to communicate at the same time. Unlike straight-through cables, we use crossover cables to connect like devices. A visual example can be seen below:
crossover cable
Notice how all we did was switch the orange-white and green-white wires, and then the orange and green wires. This will enable like devices to communicate. Crossover cables are typically used in the following situations:
Use a crossover cable when:

  • 1. Connecting a computer to a router
  • 2. Connecting a computer to a computer
  • 3. Connecting a router to a router
  • 4. Connecting a switch to a switch
  • 5. Connecting a hub to a hub

While the rule of thumb is to use crossover cables with like devices, some devices do not follow standards. Others provide support for both types of cables. However, there is still something that both crossover and straight-through cables can’t do.

Senin, 22 April 2013

Mikrotik Console

RouterOS configuration can be done from text console. It supports connections over serial cable and different network protocols, as well as API for automated router configuration. Console also allows scripting of the router.

Please follow link bellow for detail:

http://wiki.mikrotik.com/wiki/Category:Console

Minggu, 21 April 2013

Sample of Mikrotik Configuration Backup (Menu Files)


Sample IP-Web_Proxy_Settings & Web_Proxy_Access


Sample Interfaces-Interfaces_List on Mikrotik


Sample IP-Address_List on Mikrotik


Sample IP-Firewall-Filter_Rules on Mikrotik


Sample IP-Firewall-Address_List On Mikrotik


Sample IP-Firewall-NAT on Mikrotik


Sample Optimized Squid Proxy Server Configuration for Windows

#    WELCOME TO SQUID 2.7.STABLE8
#    ----------------------------

# ACCESS CONTROLS
# -----------------------------------------------------------------------------
acl all src all
acl manager proto cache_object
acl localhost src 127.0.0.1/32
acl to_localhost dst 127.0.0.0/8 0.0.0.0/32
acl localnet src 172.16.0.0/12   
acl localnet src 192.168.0.0/16   
acl localnet src 202.182.189.16/28
acl localnet src 114.79.0.0/16
acl localnet src 112.215.0.0/16
acl localnet src 223.255.0.0/16
acl localnet src 202.127.0.0/16
acl SSL_ports port 443
acl Safe_ports port 80        # http
acl Safe_ports port 21        # ftp
acl Safe_ports port 443        # https
acl Safe_ports port 70        # gopher
acl Safe_ports port 210        # wais
acl Safe_ports port 1025-65535    # unregistered ports
acl Safe_ports port 280        # http-mgmt
acl Safe_ports port 488        # gss-http
acl Safe_ports port 591        # filemaker
acl Safe_ports port 777        # multiling http
acl CONNECT method CONNECT
http_access allow manager localhost
http_access deny manager
http_access deny !Safe_ports
http_access deny CONNECT !SSL_ports
http_access allow localnet
http_access allow localhost
http_access deny all
icp_access allow localnet
icp_access deny all


# NETWORK OPTIONS
# -----------------------------------------------------------------------------
http_port 3128

# MEMORY CACHE OPTIONS
# -----------------------------------------------------------------------------
cache_mem 8 MB
maximum_object_size_in_memory 8 KB

# DISK CACHE OPTIONS
# -----------------------------------------------------------------------------
cache_dir aufs c:/squid/var/cache 2000 16 256

# LOGFILE OPTIONS
# -----------------------------------------------------------------------------
access_log none
cache_log none
cache_store_log none

# OPTIONS FOR FTP GATEWAYING
# -----------------------------------------------------------------------------
refresh_pattern ^ftp:        1440    20%    10080
refresh_pattern ^gopher:    1440    0%    1440
refresh_pattern -i (/cgi-bin/|\?) 0    0%    0
refresh_pattern .        0    20%    4320
quick_abort_min 0 KB
quick_abort_max 0 KB

# HTTP OPTIONS
# -----------------------------------------------------------------------------
acl shoutcast rep_header X-HTTP09-First-Line ^ICY.[0-9]
upgrade_http0.9 deny shoutcast
acl apache rep_header Server ^Apache
broken_vary_encoding allow apache
half_closed_clients off
visible_hostname localhost

# ICP OPTIONS
# -----------------------------------------------------------------------------
log_icp_queries off

# DNS OPTIONS
# -----------------------------------------------------------------------------
dns_nameservers 172.21.2.21 8.8.4.4 208.67.220.220 8.8.8.8 208.67.222.222
hosts_file C:\Windows\SYSTEM32\DRIVERS\ETC\hosts

# MISCELLANEOUS
# -----------------------------------------------------------------------------
memory_pools off
client_db off
coredump_dir c:/squid/var/cache

Membuat Squid Proxy Server Pada Windows

Koneksi internet, seberapapun juga akan tetap mencapai titik dimana dia dianggap lambat. Dulu koneksi internet kampus yang cuman 32kbps saja sudah laku laris manis dijual seharga Rp 4.000,-. Sekarang, warnet Speedy yang 2MBps aja sudah banting harga menjadi Rp 3.000,-. Intinya, kalo nurutin keinginan, seberapapun cepat koneksi tetep aja kurang..
Bagi pengguna internet yang punya koneksi terbatas dan tidak memiliki jaringan dan server yang bisa me-manage bandwith dengan baik, koneksi 152kbps sekelas GPRS kelas 10 tentu akan terasa lambat dibandingkan dengan warnet-warnet sekarang. Bahkan pengguna 3G seperti Smart, Indosat, Telkom (dengan berbagai variannya) juga akan merasakan penurunan kecepatan seiring dengan semakin banyaknya pengguna jasa yang sama. Belum lagi kalo bicara soal pembatasan quota bandwith.
Sekarang, tinggal kita yang dituntut untuk pandai-pandai mengoptimalkan koneksi tersebut. Gimana caranya biar cepet, kuota nggak gampang habis. Nah, kali ini saya akan ulas sedikit tentang Squid Proxy yang bisa dijalankan di Windows. Dengan program ini, Anda bisa melakukan dua hal; penghematan bandwith sekaligus mempercepat koneksi Anda. Kok bisa?

Sekedar ilustrasi, beberapa waktu lalu saat saya masih gemar bermain Travian –salah satu game online– agar dapat selalu memantau perkembangan, saya gunakan koneksi internet GPRS Starone dengan menggunakan HP murah, Haier C6000. Koneksi murah meriah ini tentu sepadan dengan harganya, di tempat saya, saya cuman dapet 2 bar dengan kecepatan maksimal 152kbps, praktisnya sekitar 96kbps saja. Tentu saja jika saya cuman mengandalkan koneksi ini, saya nggak bakal bisa menampilkan web Travian dengan cepat. Namun dengan sedikit upaya, Squid proxy proses loading situs favorit tersebut bisa meningkat hingga tiga kali lipat. Bagaimana logikanya?

CARA KERJA SQUID PROXY
Tiap kita mengakses situs sebenarnya yang kita lakukan adalah mendownload semua data berupa tulisan, link, teks, gambar dan file lain dalam halaman tersebut. Dalam proses standar, semua file ini akan disimpan dalam file temporer browser. Namun pada prakteknya, tiap kita membuka halaman yang sama, kita tetap mendownload file yang sama, berulang kali. Anggap saja suatu halaman web berukuran total 500KB, maka jika kita membuka halaman tersebut sepuluh kali dalam sehari maka kita akan menggunakan bandwith sebesar 500KB x 10 = 5MB!
Proxy atau juga yang disebut Squid sebenarnya adalah program yang dikembangkan dalam dunia Linux yang bekerja efektif mengelola file temporer. Saya menemukan SquidNT yang dikembangkan dari versi linuxnya oleh Guido Serassio. Cara kerjanya sama dengan Squid di Linux, yakni dengan otomatis menyimpan semua file yang kita download saat mengakses situs di dalam satu file temporer yang disebut cache. Di sana semua konten, alamat, teks, gambar dan halaman web disimpan. Pada saat kita mengakses situs untuk pertama kali, squid akan secara otomatis menyimpannya dan membuat link bayangan agar saat halaman yang sama dibuka untuk kedua kali, browser tidak langsung mendownload dari situs aslinya. Melainkan mendownload dari cache squid yang notabene ada di PC/LAN. Sehingga halaman web akan lebih cepat terbuka. Jika kita sering membuka halaman yang sama, prosesnya akan jauh lebih cepat saat kedua kali dan seterusnya..
Sekarang kita lihat, berapa perhitungan bandwithnya. Suatu halaman sebesar 500KB, berisi halaman web sederhana dan berbagai gambar. Squid hanya akan mendownload kode HTML nya saja dan menyaring semua informasi yang ada di dalamnya. Jika dalam screening ini semua data pendukung (gambar, skrip, file) sudah ada di cache, bandwith Anda tidak akan lebih besar dari 100Kb bahkan lebih kecil lagi. Anggap saja kita lakukan refresh selama 10 kali maka hasil yang didapat adalah: 100KB x 10 =  2MB saja. Anda bisa menghemat bandwith menjadi 1/5 bahkan lebih kecil lagi!
Itulah mengapa, dulu saya tetep bisa maen Travian dengan lancar, meski cuman pake GPRS dengan kecepatan 152kbps.. hehehe.

INSTALASI DAN SETTING SQUID
Untuk memulai instalasi, silakan download dulu SquidNT. Anda bisa mendapatkan SquidNT ini di sini atau dari situs Acme Conlsulting langsung. Jika Anda berencana menggunakan squid untuk Windows Server, silakan tunggu artikel berikutnya yang akan membahas hal tersebut secara lebih detail.
[Download Squid 2.7 Stable7 untuk Windows]
[Download Alternatif Squid 2.7 Stable7 untuk Windows]
Selanjutnya langkah instalasi:
1. Ekstrak file Squid-2.7STABLE7.bin yang telah Anda download. Saya sarankan Anda ekstrak ke c:\squid\ untuk lebih mempermudah Anda mengikuti tutorial ini.
2. Lihat dan perhatikan isi folder c:\squid\etc\. Disana ada beberapa file konfigurasi default squid sebagai berikut:
- cachemgr.conf.default
- mime.conf.default
- squid.conf.default
- squid_radius_auth.conf.default
Yang perlu Anda lakukan adalah, me-rename keempat tersebut menjadi:
- cachemgr.conf
- mime.conf
- squid.conf
- squid_radius_auth.conf
3. Buka file squid.conf dengan editor teks. Anda bisa gunakan Notepad, Wordpad atau program pihak ketiga seperti Notepad++. Temukan tulisan TAG: http_port. Pastikan di bagian bawah TAG ini sudah ada tulisan http_port 3128 sehingga tampak seperti berikut:
# TAG: http_port
# Usage: port [options]
# hostname:port [options]

# If you run Squid on a dual-homed machine with an internal
# and an external interface we recommend you to specify the
# internal address:port in http_port. This way Squid will only be
# visible on the internal address.
#
# Squid normally listens to port 3128
http_port 3128
4. Temukan TAG: visible_hostname, tambahkan tulisan visible_hostname localhost di bagian bawah tag ini. Anda boleh menghapus tulisan # none. sehingga tampak seperti berikut:
# TAG: visible_hostname
# If you want to present a special hostname in error messages, etc,
# define this. Otherwise, the return value of gethostname()
# will be used. If you have multiple caches in a cluster and
# get errors about IP-forwarding you must set them to have individual
# names with this setting.
#
#Default:
visible_hostname localhost
5. Temukan http_access allow localnet. Tambahkan http_access allow localhost di bawahnya menjadi:
# Example rule allowing access from your local networks.
# Adapt localnet in the ACL section to list your (internal) IP networks
# from where browsing should be allowed
http_access allow localnet
http_access allow localhost
6. Temukan TAG: dns_nameservers, pada tulisan dns_nameservers. Pada bagian bawah tag ini, isi dengan alamat DNS dari ISP yang Anda gunakan dengan format dns_nameservers [primary DNS] [secondary DNS]. Dalam hal ini saya menggunakan ISP speedy Wilayah Jatim maka akan tampak sebagai berikut:
# TAG: dns_nameservers
# Use this if you want to specify a list of DNS name servers
# (IP addresses) to use instead of those given in your
# /etc/resolv.conf file.
# On Windows platforms, if no value is specified here or in
# the /etc/resolv.conf file, the list of DNS name servers are
# taken from the Windows registry, both static and dynamic DHCP
# configurations are supported.
#
# Example: dns_nameservers 10.0.0.1 192.172.0.4
#
#Default:
dns_nameservers 202.134.1.10 203.130.208.18
Anda bisa temukan DNS yang lebih tepat untuk koneksi Anda dengan mencoba alamat DNS dari koleksi Server DNS Guntingbatukertas.
Akhiri dengan menyimpan file squid.conf tersebut.
7. Buat Cache_Dir (swap directories) dengan cara buka Start > Run > Ketik CMD [Enter]. Dalam Command Prompt, ketik baris perintah berikut:
c:\squid\sbin\squid.exe -z [Enter]
Jika muncul pesan popup Windows Security Alert seperti gambar di bawah, pilih Unblock untuk memberi akses kepada instalasi Squid Proxy.

8. Selanjutnya, Starting Squid Cache dengan cara ketik perintah berikut:
c:\squid\sbin\squid.exe -d l -D [Enter]
Tunggu beberapa saat kemudian tekan CTRL + C.
9. Buat Squid Service serta store registry dengan cara ketik perintah berikut:
c:\squid\sbin\squid.exe -i [Enter]
c:\squid\sbin\squid.exe -O -D [Enter]
Setelah mengetik keempat baris perintah di atas, layar Command Prompt Anda seharusnya akan tampak seperti berikut ini:

10. Jalankan Service Panel  melalui Control Panel > Administrative Tools > Services. atau
Start > Run > ketik Services.msc [Enter]
Temukan service bernama Squid > Klik link Start di panel sebelah kiri untuk menjalankan Squid.

11. Selanjutnya, Ubah setting Browser Anda. Arahkan proxy pada browser anda ke alamat localhost dengan port 3128. Untuk Firefox, langkah setting nya tampak seperti berikut:

Secara default Squid akan menjalankan proses sendiri tiap kali PC melakukan restart. Cache squid ini disimpan dalam folder c:\squid\var\cache. Untuk melihat log file squid proxy, Anda bisa mengetikkan:
more c:\squid\var\logs\access.log [Enter]

UNINSTALL
Jika Anda ingin menghapus squid, ketikkan perintah berikut di Command Prompt.
c:\squid\sbin>squid -r -n squid [Enter]
Selesai. Gampang bukan?
BONUS: CARA MUDAH INSTALASI
Bagi Anda yang nggak mau pusing-pusing dengan setting di atas, saya sudah sediakan Squid Proxy di atas yang sudah saya konfigurasi lengkap. Anda tinggal meng-ekstrak, dobel klik file konfigurasi, setting browser dan Voila! Kecepatan akses Anda sekarang jadi beberapa kali lebih cepat.
[Download SquidProxy-2.7STABLE7 Siap Pakai]
Password: guntingbatukertas.com
Keterangan:
Dalam file konfigurasi default (squid.conf) Squid siap pakai di atas saya menggunakan dns dari Google. Dengan setting tersebut seharusnya Anda sudah bisa langsung online tanpa melakukan perubahan apapun.
Tapi sekedar untuk backup, saya sudah menyertakan beberapa DNS lain seperti DNS Speedy dan OpenDNS. Jika perlu, silakan pilih sesuai keinginan. Dalam hal ini yang perlu Anda lakukan adalah membuka file squid.conf di \squid\etc\ dan temukan bagian berikut:
….
# Hapus tanda (#) di depan baris berikut jika Anda ingin menggunakan DNS Speedy Jatim dan Jateng
#dns_nameservers 202.134.1.10 203.130.208.18
# Hapus tanda (#) di depan baris berikut jika Anda ingin menggunakan DNS Speedy Jakarta – Jateng
#dns_nameservers 202.134.0.155 203.130.208.18
# Hapus tanda (#) di depan baris berikut jika Anda ingin menggunakan DNS OpenDNS
#dns_nameservers 208.67.222.222 208.67.220.220
# Tambah tanda (#) di depan baris berikut jika Anda TIDAK ingin menggunakan DNS Google
dns_nameservers 8.8.8.8 8.8.4.4
…..
Perhatikan, dari baris di atas, hanya satu baris dns_nameservers yang tidak didahului tanda comment (tanda #). Yakni di depan dns_nameservers punya Google. Itulah setting yang sedang aktif/digunakan. Untuk memilih setting dns yang lain Anda tinggal memberi comment (tanda #) di depan dns_nameservers yang sedang aktif dan menghapus dns_nameservers lain yang Anda inginkan. Ingat, Anda hanya diperbolehkan memlih dns_nameservers yang aktif.
Misalnya saya pengen pake OpenDNS, maka setting diatas perlu saya ubah menjadi:
….
# Hapus tanda (#) di depan baris berikut jika Anda ingin menggunakan DNS Speedy Jatim dan Jateng
#dns_nameservers 202.134.1.10 203.130.208.18
# Hapus tanda (#) di depan baris berikut jika Anda ingin menggunakan DNS Speedy Jakarta – Jateng
#dns_nameservers 202.134.0.155 203.130.208.18
# Hapus tanda (#) di depan baris berikut jika Anda ingin menggunakan DNS OpenDNS
dns_nameservers 208.67.222.222 208.67.220.220
# Tambah tanda (#) di depan baris berikut jika Anda TIDAK ingin menggunakan DNS Google
#dns_nameservers 8.8.8.8 8.8.4.4
…..
Simpan, dan setting Anda yang baru siap dicoba!
Semoga bermakna dan bermanfaat. :)

source: http://guntingbatukertas.com/sistem-operasi/windows/hemat-bandwith-dan-dongkrak-kecepatan-akses-internet-dengan-squid-proxy/

Kamis, 18 April 2013

Visual Basic Built-In Functions: Format Number

Visual Basic Built-In Functions: Format Number

  
Introduction

So far, after performing a calculation, we were presenting the result "as is". To appropriately display a value, the Visual Basic language provides a function named Format. This function can be used for different types of values The most basic technique consists of passing it an expression that holds the value to display. The syntax of this function is:

Public Shared Function Format( _
   ByVal Expression As Object, _
   Optional ByVal Style As String = "" _
) As String
As mentioned above, this function can be used in various scenarios. The simplest way to use this function is to pass it a number, a string, or a date/time). The function would then produce that number.
Besides the Format() function, the Visual Basic language provides some additional functions we will review below.
Formatting a Number

So far, to display a number, we simply passed it to the MsgBox() function or to another procedure. In some cases, you may want the number to display in a particular format. To control how the number should display, you can pass the second argument of the Format() function. This argument would be passed as a string.
To produce the number in a general format, you can pass the second argument as "g", "G", "f", or "F" .
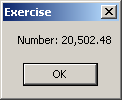
To display the number with a decimal separator, pass the second argument as "n", "N", or "Standard". Here is an example:
Public Module Exercise

    Public Function Main() As Integer
        Dim Number As Double

        Number = 20502.48

        MsgBox("Number: " & Format(Number, "STANDARD"))
        Return 0
    End Function

End Module
This would produce:
Format
An alternative to get this format is to call a function named FormatNumber. Its syntax is:
Function FormatNumber(
   ByVal Expression As Object,
   Optional ByVal NumDigitsAfterDecimal As Integer = -1,
   Optional ByVal IncludeLeadingDigit As TriState = TriState.UseDefault,
   Optional ByVal UseParensForNegativeNumbers As TriState = TriState.UseDefault,
   Optional ByVal GroupDigits As TriState = TriState.UseDefault
) As String
Only the first argument is required and it represents the value to display. If you pass only this argument, you get the same format as the Format() function called with the Standard option. Here is an example:
Public Module Exercise

    Public Function Main() As Integer
        Dim Number As Double

        Number = 20502.48

        MsgBox("Number: " & Format(Number, "STANDARD"))
        MsgBox("Number: " & FormatNumber(Number))
        Return 0
    End Function

End Module
This would produce the same result as above.
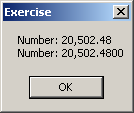
If you call the Format() function with the Standard option, it would consider only the number of digits on the right side of the decimal separator. If you want to display more digits than the number actually has, call the FormatNumber() function and pass a second argument with the desired number. Here is an example:
Public Module Exercise

    Public Function Main() As Integer
        Dim Number As Double

        Number = 20502.48

        MsgBox("Number: " & Format(Number, "STANDARD") & vbCrLf & _
               "Number: " & FormatNumber(Number, 4))
        Return 0
    End Function

End Module
This would display:
Format Number


In the same way, if you want the number to display with less numbers on the right side of the decimal separator, specify that number.
As a third alternative, you can call the Format() function. In reality, the second argument is used to format the number with many more options. To represent the integral part of a number, you use the # sign. To specify the number of digits to display on the right side of the decimal separator, type a period on the right side of # followed by the number of 0s representing each decimal place. Here is an example:
Public Module Exercise

    Public Function Main() As Integer
        Dim Number As Double

        Number = 20502.48

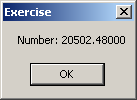
        MsgBox("Number: " & Format(Number, "#.00000"))
        Return 0
    End Function

End Module
The five 0s on the right side of the period indicate that you want to display 5 digits on the right side of the period. This would produce:
Format
You can enter as many # signs as you want; it wouldn't change anything. Here is an example:
Public Module Exercise

    Public Function Main() As Integer
        Dim Number As Double

        Number = 20502.48

        MsgBox("Number: " & Format(Number, "##########.00000"))
        Return 0
    End Function

End Module
This would produce the same result as above. To specify that you want to display the decimal separator, include its character between the # signs. Here is an example:
Public Module Exercise

    Public Function Main() As Integer
        Dim Number As Double

        Number = 20502.48

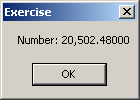
        MsgBox("Number: " & Format(Number, "###,#######.00000"))
        Return 0
    End Function

End Module
This would produce:
Format
You can include any other character or symbol you want in the string to be part of the result, but you should include such a character only at the beginning or the end of the string, otherwise the interpreter might give you an unexpected result.

MS Access: Format Function (with Numbers)

MS Access: Format Function (with Numbers)
This MSAccess tutorial explains how to use the Access Format function (as it applies to numeric values) with syntax and examples.
Description
The Microsoft Access Format function takes a numeric expression and returns it as a formatted string.
Syntax
The syntax for the Format function in MS Access is:
Format ( expression, [ format ] )
Parameters or Arguments
expression
The value to format.
format
Optional. It is the format to apply to the expression. You can either define your own format or use one of the named formats that Access has predefined such as:
Format
Explanation
General Number
Displays a number without thousand separators.
Currency
Displays thousand separators as well as two decimal places.
Fixed
Displays at least one digit to the left of the decimal place and two digits to the right of the decimal place.
Standard
Displays the thousand separators, at least one digit to the left of the decimal place, and two digits to the right of the decimal place.
Percent
Displays a percent value - that is, a number multiplied by 100 with a percent sign. Displays two digits to the right of the decimal place.
Scientific
Scientific notation.
Yes/No
Displays No if the number is 0. Displays Yes if the number is not 0.
True/False
Displays True if the number is 0. Displays False if the number is not 0.
On/Off
Displays Off if the number is 0. Displays On is the number is not 0.
Applies To
The Format function can be used in the following versions of Microsoft Access:
  • Access 2013, Access 2010, Access 2007, Access 2003, Access XP, Access 2000
Example
Let's look at how to use the Format function with numbers in MS Access:
Format (210.6, "#,##0.00")
Result: '210.60'

Format (210.6, "Standard")
Result: '210.60'

Format (0.981, "Percent")
Result: '98.10%'

Format (1267.5, "Currency")
Result: '$1,267.50'
Example in VBA Code
The Format function can be used in VBA code in Microsoft Access.
For example:
Dim LValue As String

LValue = Format (0.981, "Percent")
In this example, the variable called LValue would now contain the value of '98.10%'.
Example in SQL/Queries
You can also use the Format function in a query in Microsoft Access.
For example:


In this query, we have used the Format function as follows:
Expr1: Format(UnitPrice,"Currency")
This query will return the UnitPrice field formatted as a currency value. Since no label was provided, the results will be displayed in a column called Expr1. You can replace Expr1 with a column name that is more meaningful.
For example:
FormattedValue: Format(UnitPrice,"Currency")
The results would now be displayed in a column called FormattedValue.