Senin, 27 April 2015

Hosting File di Google Drive

Pertama-tama, upload file ke google drive.
Setelah upload, file tersebut dishare ke Public.
maka kita akan diberikan link untuk membuka file yang baru saja di share ke public seperti berikut:
https://drive.google.com/file/d/0B5a_BvnSPwsxdGMzZFl2bm10TVU/view?usp=sharing
link di atas bisa digunakan untuk membuka file yang baru saja diupload namun tidak bisa diakses secara langsung.
Agar file tersebut bisa diakses secara langsung, rubah linknya sebagai berikut:
https://googledrive.com/host/0B5a_BvnSPwsxdGMzZFl2bm10TVU

Ok, smoga bermanfaat.


Create Excel VBA Macro to Delete Duplicate Cells in One Row

Ok guys, we want to make this:


to be like this:


Well, here is the code:

Public Function LastRow() As Long
    With ActiveSheet
        LastRow = .Cells(.Rows.Count, ActiveCell.Column).End(xlUp).Row
    End With
End Function


Sub deldup()
For n = ActiveCell.Row To LastRow()
    Do While (Cells(n, ActiveCell.Column).Value = Cells(n - 1, ActiveCell.Column).Value) And (Cells(n, ActiveCell.Column).Value <> "")
        Rows(n).EntireRow.Delete
    Loop
Next n
End Sub


to use this macro, just select the top of the row that we want to delete the duplicate cell, in this case is B3.
then just run the macro....done.


Jumat, 24 April 2015

Windows Command Service Control

SC.exe

Service Control - Create, Start, Stop, Query or Delete any Windows SERVICE. The command options for SC are case sensitive.
Syntax
      SC [\\server] [command] [service_name] [Options]

Key
   server       : The machine where the service is running

   service_name : The KeyName of the service, this is often but not always
                  the same as the DisplayName shown in Control Panel, Services.
                  You can get the KeyName by running: 
                     SC GetKeyName <DisplayName>

   commands:
          query  [qryOpt]   Show status
          queryEx [qryOpt]  Show extended info - pid, flags
          GetDisplayName    Show the DisplayName
          GetKeyName        Show the ServiceKeyName
          EnumDepend        Show Dependencies
          qc                Show config - dependencies, full path etc
          start          START a service.
          stop           STOP a service
          pause          PAUSE a service.
          continue       CONTINUE a service.
          create         Create a service. (add it to the registry)
          config         permanently change the service configuration
          delete         Delete a service (from the registry)
          control        Send a control to a service
          interrogate    Send an INTERROGATE control request to a service
          Qdescription   Query the description of a service
          description    Change the description of a service
          Qfailure       Query the actions taken by a service upon failure
          failure        Change the actions taken by a service upon failure
          sdShow         Display a service's security descriptor using SDDL
          SdSet          Sets a service's security descriptor using SDDL

   qryOpt:
          type= driver|service|all
                         Query specific types of service
          state= active|inactive|all
                         Query services in a particular state only
          bufsize= bytes 
          ri= resume_index_number (default=0)
          group= groupname
                         Query services in a particular group

   Misc commands that don’t require a service name:
          SC  QueryLock  Query the LockStatus for the ServiceManager Database.
                         this will show if a service request is running
          SC  Lock       Lock the Service Database
          SC  BOOT       Values are {ok | bad} Indicates whether to save  
                         the last restart configuration as the `last-known-good`
                         restart configuration
   Options
     The CREATE and CONFIG commands allow additional service options to be set
     e.g. to disable a service: SC config "Name of Service" start= disabled
     see the built-in help for more: 'SC create' and 'SC config'
Note the qryOpt options above are case sensitive - they must be entered in lower case, also the position of spaces and = must be exactly as shown.
The SC command duplicates some aspects of the NET command but adds the ability to create a service.
SC query will display if a service is running, giving output like this:
        SERVICE_NAME       : messenger
        TYPE               : 20  WIN32_SHARE_PROCESS
        STATE              : 4  RUNNING
                                (STOPPABLE,NOT_PAUSABLE,ACCEPTS_SHUTDOWN)
        WIN32_EXIT_CODE    : 0  (0x0)
        SERVICE_EXIT_CODE  : 0  (0x0)
        CHECKPOINT         : 0x0
        WAIT_HINT          : 0x0
To retrieve specific information from SC's output, pipe into FIND or FindStr
e.g.
  C:\> SC query messenger | FIND "STATE" | FIND "STOPPED"

  C:\> SC query messenger | FIND "STATE" | FIND "RUNNING"
The statements above will return an %ERRORLEVEL% = 1 if the text is not found
IF errorlevel 1 GOTO :my_subroutine

The NET START command can be used in a similar way to check if a service is running:
   NET START | FIND "Service name" > nul
   IF errorlevel 1 ECHO The service is not running
The service control manager will normally wait up to 30 seconds to allow a service to start, you can modify this time (30,000 milliseconds) in the registry
HKLM\SYSTEM\CurrentControlSet\Control
ServicesPipeTimeout (REG_DWORD)
Some options only take effect at the point when the service is started e.g. the SC config command allows the executable of a service to be changed. When the service next starts up it will run the new executable. Config changes requires the current user to have “permission to configure the service”.
Examples:
 SC GetKeyName "task scheduler"
 SC GetDisplayName schedule 
 SC start schedule
 SC QUERY schedule
 SC CONFIG "Schedule" start= disabled
 SC QUERY type= driver
 SC QUERY state= all |findstr "DISPLAY_NAME STATE" >svc_installed.txt 
 SC \\myServer CONFIG myService obj= LocalSystem password= mypassword
 SC CONFIG MyService binPath=c:\myprogram.exe obj=".\LocalSystem" password=""  
Watch out for extra spaces:
SC QUERY state= all Works
SC QUERY state =all Fails!

source: http://ss64.com/nt/sc.html

Add or remove items from a drop-down list in Excel 2013


After you create a drop-down list, you might want to add more items or delete items. How you do that depends on how the list was created. When you create a drop-down list, you connect it to a list of entries, which are used to populate your drop-down list. When you hook up those entries to your drop-down list, you can point to either a name that you’ve given the list (called a named range), or to the cells that contain your list of entries (called a range of cells).

Edit a drop-down list that’s based on a named range

  1. Open the worksheet that has the named range for your drop-down list.
    Tip   To identify a named range, select the range and look for its name in the Name Box. To locate a named range, see Find named ranges.
    Name box showing a named range
  2. Do any of the following:
    • To add an item, go to the end of the list and type the new item.
    • To remove an item, right-click its cell, click Delete, and then click OK to shift the cells up.
    Tip    After you edit the list, sort it the way you want it to appear in the drop-down list.
  3. Click Formulas > Name Manager.
    Click the Formulas tab, and then click Name Manager
  4. In the Name Manager box, click the named range you want to update.
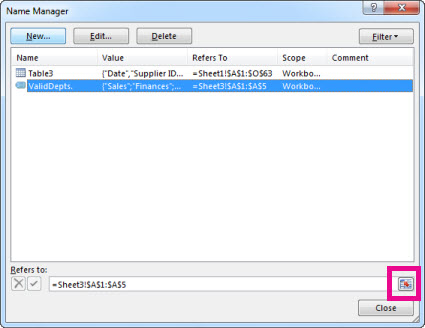
  5. To the right of the Refers to box, click the Collapse Dialog Box button image button to collapse the dialog box, and then on your worksheet select all of the cells that contain the entries for your drop-down list.
    Collapse Dialog Box button in the Name Manager box
  6. Click the Expand Dialog Box button image button to expand the dialog box.
    Expand Dialog Box button in the Name Manager box
  7. Click Close, and then in the box that appears, click Yes to save your changes.

Edit a drop-down list that’s based on a range of cells

  1. Open the worksheet that has the data for your drop-down list.
  2. Do any of the following:
    • To add an item, go to the end of the list and type the new item.
    • To remove an item, right-click its cell, click Delete, and then click OK to shift the cells up.
    Tip    After you edit the list, sort it the way you want it to appear in the drop-down list.
  3. On the worksheet where you applied the drop-down list, select a cell that has the drop-down list.
  4. Click Data > Data Validation.
    Data Validation on the Data tab
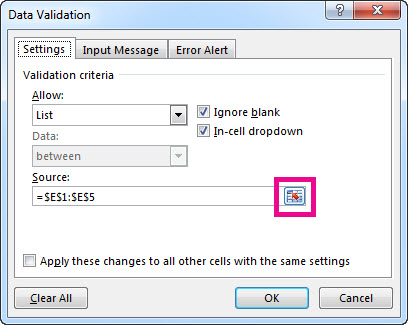
  5. On the Settings tab, to the right of the Source box, click the Collapse Dialog Box button image button to collapse the dialog box, and then on the worksheet that has the entries for your drop-down list select all of the cells containing those entries.
    Collapse Dialog Box button on the Settings tab
  6. Click the Expand Dialog Box button image button to expand the dialog box.
    Expand Dialog Box button in the Data Validation box
  7. To update all cells that have the same drop-down list applied, check the Apply these changes to all other cells with the same settings box.

Create a drop-down list in Microsoft Excel 2013


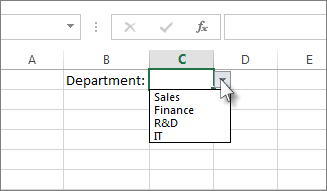
You can make a worksheet more efficient by providing drop-down lists. Someone using your worksheet clicks an arrow, and then clicks an entry in the list.
A drop-down list in Excel
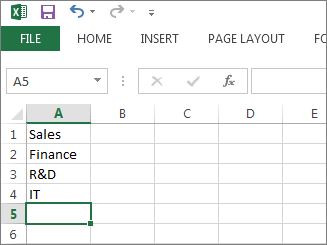
  1. On a new worksheet, type the entries that you want to appear in your drop-down list. The entries should be in a single column or row without any blank cells, like this:
    Create your list of entries
    Tip    Now is a good time to sort your data in the order you want it to appear in your drop-down list.
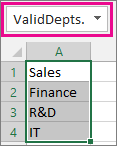
  2. Select all of your entries, right-click, and then click Define Name.
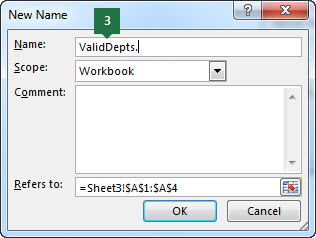
  3. In the Name box, type a name for your entries, for example, ValidDepts, and then click OK. Be sure your name doesn’t have any spaces in it. This name won’t show up in your list, but you need to name it so you can link it to your drop-down list.
    Add a name to the New Name box
  4. Click in the cell in the worksheet where you want the drop-down list.
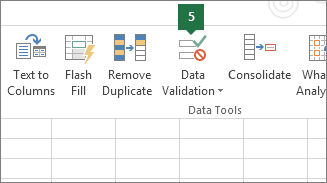
  5. Click Data >Data Validation.
    Click the Data tab and then click Data Validation
    Tips    Can’t click Data Validation? Here are a few reasons why that might happen.
    • Drop-down lists can’t be added to tables that are linked to a SharePoint site. Unlink the table or remove the table formatting, and then try step 5 again.
    • The worksheet might be protected or shared. Remove the protection or stop sharing the worksheet, and then try step 5 again.
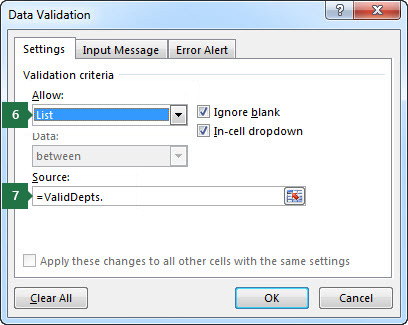
  6. On the Settings tab, in the Allow box, click List.
  7. In the Source box, type and equal sign (=), immediately followed by the name you gave your list in step 3. For example, =ValidDepts.
    Options on the Settings tab.
  8. Check the In-cell dropdown box.
  9. If it’s OK for people to leave the cell empty, check the Ignore blank box.
  10. Click the Input Message tab.
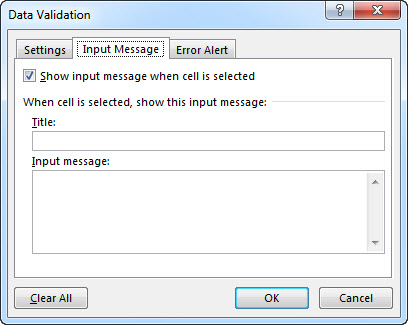
  11. If you want a message to pop up when the cell is clicked, check the Show input message when cell is selected box, and type a title and message in the boxes (up to 225 characters). If you don’t want a message to show up, clear the check box.
    Input Message tab
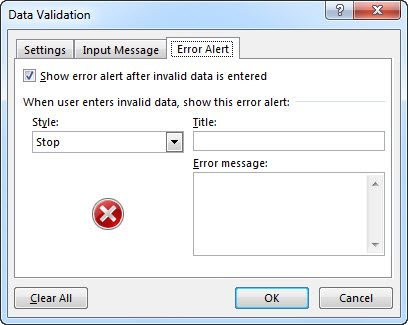
  12. Click the Error Alert tab.
  13. Check the Show error alert after invalid data is entered box, pick an option from the Style box, and type a title and message. If you don’t want a message to show up, clear the check box.
    Error Alert tab
    Not sure which option to pick in the Style box?
    • To show a message that doesn’t stop people from entering data that isn’t in the drop-down list, click Information or Warning. Information will show a message with this icon Information icon and Warning will show a message with this icon Warning icon.
    • To stop people from entering data that isn’t in the drop-down list, click Stop.
      Note   If you don't add a title or text, the title defaults to "Microsoft Excel" and the message to: "The value you entered is not valid. A user has restricted values that can be entered into this cell."

      source: https://support.office.com/en-in/article/Create-a-drop-down-list-7693307a-59ef-400a-b769-c5402dce407b

Kamis, 23 April 2015

Senin, 20 April 2015

Cara menghilangkan Tulisan Tampilkan Posting Dengan Label

  1. Login ke blogger. ke pengaturan template.
  2. Selanjutnya edit HTML dan cari kode ]]></b:skin> gunakan Ctrl f untuk mempermudah pencarian.
  3. Kemudian letakkan kode dibawah ini, diatas ]]></b:skin>
  4. .status-msg-wrap{
    display:none;
    }
    .status-msg-body{
    display:none;
    }
    .status-msg-border{
    display:none;
    }
  5. Terakhir, save template. Selesai.

Disable Windows Service To Optimize PC for Working

To optimize PC for Working, I have made batch file call dsvc.cmd to stop and disable unnecessary service.

Below are the content of dsvc.cmd:

sc config AxInstSV start= demand
sc config SensrSvc start= demand
sc config AdobeARMservice start= disabled
sc config AdvancedSystemCareService8 start= disabled
sc config AeLookupSvc start= disabled
sc config AppIDSvc start= auto
sc config Appinfo start= auto
sc config ALG start= auto
sc config AppMgmt start= auto
sc config aspnet_state start= auto
sc config BITS start= auto
sc config BFE start= auto
sc config BDESVC start= demand
sc config wbengine start= demand
sc config bthserv start= auto
sc config PeerDistSvc start= demand
sc config CertPropSvc start= auto
sc config KeyIso start= auto
sc config EventSystem start= auto
sc config COMSysApp start= auto
sc config Browser start= demand
sc config VaultSvc start= auto
sc config CryptSvc start= auto
sc config DcomLaunch start= auto
sc config UxSms start= auto
sc config Dhcp start= auto
sc config DPS start= disabled
sc config WdiServiceHost start= auto
sc config WdiSystemHost start= auto
sc config defragsvc start= auto
sc config TrkWks start= disabled
sc config MSDTC start= auto
sc config Dnscache start= disabled
sc config EFS start= auto
sc config EapHost start= auto
sc config Fax start= disabled
sc config fdPHost start= auto
sc config FDResPub start= auto
sc config gusvc start= disabled
sc config gpsvc start= auto
sc config hkmsvc start= auto
sc config HomeGroupListener start= auto
sc config HomeGroupProvider start= auto
sc config hidserv start= auto
sc config IKEEXT start= auto
sc config ImDskSvc start= auto
sc config "Intel(R) Capability Licensing Service Interface" start= auto
sc config "Intel(R) Capability Licensing Service TCP IP Interface" start= auto
sc config cphs start= demand
sc config jhi_service start= auto
sc config LMS start= auto
sc config UI0Detect start= auto
sc config SharedAccess start= demand
sc config IEEtwCollectorService start= disabled
sc config iphlpsvc start= auto
sc config PolicyAgent start= auto
sc config Cwbrxd start= disabled
sc config AVP15.0.0 start= auto
sc config KtmRm start= auto
sc config lltdsvc start= demand
sc config LiveUpdateSvc start= disabled
sc config Mcx2Svc start= auto
sc config clr_optimization_v2.0.50727_32 start= demand
sc config clr_optimization_v4.0.30319_32 start= demand
sc config MSiSCSI start= auto
sc config ClickToRunSvc start= auto
sc config swprv start= auto
sc config MozillaMaintenance start= demand
sc config MMCSS start= demand
sc config NetMsmqActivator start= demand
sc config NetPipeActivator start= demand
sc config NetTcpActivator start= demand
sc config NetTcpPortSharing start= demand
sc config Netlogon start= disabled
sc config napagent start= auto
sc config Netman start= auto
sc config netprofm start= auto
sc config NlaSvc start= auto
sc config nsi start= auto
sc config ose start= auto
sc config osppsvc start= auto
sc config CscService start= auto
sc config WPCSvc start= auto
sc config PNRPsvc start= auto
sc config p2psvc start= auto
sc config p2pimsvc start= auto
sc config pla start= auto
sc config PlugPlay start= auto
sc config IPBusEnum start= auto
sc config PNRPAutoReg start= auto
sc config WPDBusEnum start= auto
sc config Power start= auto
sc config Spooler start= auto
sc config wercplsupport start= auto
sc config PcaSvc start= disabled
sc config ProtectedStorage start= auto
sc config QWAVE start= auto
sc config RasAuto start= auto
sc config RasMan start= auto
sc config SessionEnv start= disabled
sc config TermService start= auto
sc config UmRdpService start= disabled
sc config RpcSs start= auto
sc config RpcLocator start= auto
sc config RemoteRegistry start= auto
sc config RemoteAccess start= disabled
sc config RpcEptMapper start= auto
sc config seclogon start= disabled
sc config SstpSvc start= auto
sc config SamSs start= auto
sc config wscsvc start= auto
sc config LanmanServer start= auto
sc config "Service KMSELDI" start= demand
sc config ShellHWDetection start= auto
sc config SCardSvr start= auto
sc config SCPolicySvc start= demand
sc config SNMPTRAP start= auto
sc config sppsvc start= demand
sc config sppuinotify start= demand
sc config SSDPSRV start= auto
sc config StorSvc start= auto
sc config SysMain start= auto
sc config SENS start= auto
sc config TabletInputService start= disabled
sc config Schedule start= auto
sc config lmhosts start= auto
sc config TapiSrv start= auto
sc config Themes start= disabled
sc config THREADORDER start= auto
sc config TBS start= demand
sc config upnphost start= auto
sc config ProfSvc start= auto
sc config vds start= auto
sc config VSS start= auto
sc config wampapache start= demand
sc config wampmysqld start= demand
sc config WebClient start= auto
sc config Audiosrv start= auto
sc config AudioEndpointBuilder start= auto
sc config SDRSVC start= disabled
sc config WbioSrvc start= demand
sc config idsvc start= auto
sc config WcsPlugInService start= auto
sc config wcncsvc start= auto
sc config WinDefend start= disabled
sc config wudfsvc start= auto
sc config WerSvc start= auto
sc config Wecsvc start= auto
sc config eventlog start= auto
sc config MpsSvc start= auto
sc config FontCache start= disabled
sc config StiSvc start= demand
sc config msiserver start= demand
sc config Winmgmt start= auto
sc config ehRecvr start= disabled
sc config ehSched start= disabled
sc config WMPNetworkSvc start= disabled
sc config TrustedInstaller start= demand
sc config FontCache3.0.0.0 start= auto
sc config WinRM start= auto
sc config WSearch start= auto
sc config W32Time start= demand
sc config wuauserv start= disabled
sc config WinHttpAutoProxySvc start= auto
sc config dot3svc start= auto
sc config Wlansvc start= auto
sc config wmiApSrv start= auto
sc config LanmanWorkstation start= auto
sc config WwanSvc start= auto
Copas batch script above and run.

Enjoy.

Kamis, 16 April 2015

Maintain Your Hosts File

Download maintained hosts file from link address below:
1. http://hosts-file.net  main-update  partial-update
2. http://someonewhocares.org
3. http://winhelp2002.mvps.org/hosts.zip

The hosts file is a computer file used by an operating system to map hostnames to IP addresses. The hosts file is a plain text file, and is conventionally named hosts.

The hosts file contains lines of text consisting of an IP address in the first text field followed by one or more host names. Each field is separated by white space – tabs are often preferred for historical reasons, but spaces are also used. Comment lines may be included; they are indicated by a hash character (#) in the first position of such lines. Entirely blank lines in the file are ignored. For example, a typical hosts file may contain the following:

127.0.0.1  localhost loopback
::1        localhost

The location of the hosts file in the file system hierarchy varies by operating system. It is usually named hosts, without an extension.

Operating System Version(s) Location
Unix, Unix-like, POSIX
/etc/hosts
Microsoft Windows 3.1 %WinDir%\HOSTS
95, 98, ME %WinDir%\hosts
NT, 2000, XP, 2003, Vista,
2008, 7, 2012, 8
%SystemRoot%\System32\drivers\etc\hosts 
Windows Mobile, Windows Phone
Registry key under HKEY_LOCAL_MACHINE\Comm\Tcpip\Hosts
Apple Macintosh 9 and earlier Preferences or System folder
Mac OS X 10.0 – 10.1.5 (Added through NetInfo or niload)
Mac OS X 10.2 and newer /etc/hosts (a symbolic link to /private/etc/hosts)
Novell NetWare
SYS:etc\hosts
OS/2 & eComStation
"bootdrive":\mptn\etc\
Symbian Symbian OS 6.1–9.0 C:\system\data\hosts
Symbian OS 9.1+ C:\private\10000882\hosts
MorphOS NetStack ENVARC:sys/net/hosts
AmigaOS 4 DEVS:Internet/hosts
Android
/etc/hosts (a symbolic link to /system/etc/hosts)
iOS iOS 2.0 and newer /etc/hosts (a symbolic link to /private/etc/hosts)
TOPS-20
<SYSTEM>HOSTS.TXT
Plan 9
/lib/ndb/hosts
BeOS
/boot/beos/etc/hosts
Haiku
/boot/common/settings/network/hosts
OpenVMS UCX UCX$HOST
TCPware TCPIP$HOST
RISC OS
 !Boot.Resources.!Internet.files.Hosts
later boot sequence  !Boot.Choices.Hardware.Disabled.Internet.Files.Hosts

Rabu, 15 April 2015

Visual Studio Community 2013 Offline Installer Download Link

Visual Studio Community 2013

A full-Featured IDE - Free.
Start coding the app of your dreams for Windows, Android, and iOS.

Why Visual Studio Community?

 Powerful

Powerful

Code faster than ever with an advanced code editor and seamless debugging.

Versatile

Create apps for Windows, Android, and iOS devices with integrated tools.

Extensible

Choose from thousands of extensions for Visual Studio, or create your own.

DOWNLOAD Visual Studio Community 2013 offline installer here!

Senin, 13 April 2015

PHP Data Pagination

First, create database thru console:

mysql> create database world;
and then import world_innodb.sql.zip thru phpmyadmin.
copas the script below.
index.php
<?php
    require_once 'Paginator.class.php';
    $server = "localhost";
    $username = "root";
    $password = "";
    $database = "world";
    $conn       = new mysqli( $server, $username, $password, $database );

    $limit      = ( isset( $_GET['limit'] ) ) ? $_GET['limit'] : 10;
    $page       = ( isset( $_GET['page'] ) ) ? $_GET['page'] : 1;
    $links      = ( isset( $_GET['links'] ) ) ? $_GET['links'] : 7;
    $query      = "SELECT City.Name, City.CountryCode, Country.Code, Country.Name AS Country, Country.Continent, Country.Region FROM City, Country WHERE City.CountryCode = Country.Code";

    $Paginator  = new Paginator( $conn, $query );

    $results    = $Paginator->getData( $limit, $page );
?>
<!DOCTYPE html>

    <head>
        <title>PHP Pagination</title>
        <link rel="stylesheet" href="css/bootstrap.min.css">
    </head>
    <body>
        <div class="container">
                <div class="col-md-10 col-md-offset-1">
                <h1>PHP Pagination</h1>
                <table class="table table-striped table-condensed table-bordered table-rounded">
                        <thead>
                                <tr>
                                <th>City</th>
                                <th width="20%">Country</th>
                                <th width="20%">Continent</th>
                                <th width="25%">Region</th>
                        </tr>
                        </thead>
                        <tbody>
                        <?php for( $i = 0; $i < count( $results->data ); $i++ ) : ?>
                                <tr>
                                        <td><?php echo $results->data[$i]['Name']; ?></td>
                                        <td><?php echo $results->data[$i]['Country']; ?></td>
                                        <td><?php echo $results->data[$i]['Continent']; ?></td>
                                        <td><?php echo $results->data[$i]['Region']; ?></td>
                                </tr>
                        <?php endfor; ?>                                               
                        </tbody>
                </table>
                <?php echo $Paginator->createLinks( $links, 'pagination pagination-sm' ); ?>
                </div>
        </div>
    </body>
</html>

Paginator.class.php

<?php
class Paginator {

    private $_conn;
    private $_limit;
    private $_page;
    private $_query;
    private $_total;

    public function __construct( $conn, $query ) {
        $this->_conn = $conn;
        $this->_query = $query;
        $rs= $this->_conn->query( $this->_query );
        $this->_total = $rs->num_rows;   
    }

    public function getData( $limit = 10, $page = 1 ) {
        $this->_limit   = $limit;
        $this->_page    = $page;
        if ( $this->_limit == 'all' ) {
            $query      = $this->_query;
        } else {
            $query      = $this->_query . " LIMIT " . ( ( $this->_page - 1 ) * $this->_limit ) . ", $this->_limit";
        }
        $rs             = $this->_conn->query( $query );
        while ( $row = $rs->fetch_assoc() ) {
            $results[]  = $row;
        }
        $result         = new stdClass();
        $result->page   = $this->_page;
        $result->limit  = $this->_limit;
        $result->total  = $this->_total;
        $result->data   = $results;
        return $result;
    }
    public function createLinks( $links, $list_class ) {
        if ( $this->_limit == 'all' ) {
            return '';
        }
        $last       = ceil( $this->_total / $this->_limit );
        $start      = ( ( $this->_page - $links ) > 0 ) ? $this->_page - $links : 1;
        $end        = ( ( $this->_page + $links ) < $last ) ? $this->_page + $links : $last;
        $html       = '<ul class="' . $list_class . '">';
        $class      = ( $this->_page == 1 ) ? "disabled" : "";
        $html       .= '<li class="' . $class . '"><a href="?limit=' . $this->_limit . '&page=' . ( $this->_page - 1 ) . '">&laquo;</a></li>';
        if ( $start > 1 ) {
            $html   .= '<li><a href="?limit=' . $this->_limit . '&page=1">1</a></li>';
            $html   .= '<li class="disabled"><span>...</span></li>';
        }
        for ( $i = $start ; $i <= $end; $i++ ) {
            $class  = ( $this->_page == $i ) ? "active" : "";
            $html   .= '<li class="' . $class . '"><a href="?limit=' . $this->_limit . '&page=' . $i . '">' . $i . '</a></li>';
        }
        if ( $end < $last ) {
            $html   .= '<li class="disabled"><span>...</span></li>';
            $html   .= '<li><a href="?limit=' . $this->_limit . '&page=' . $last . '">' . $last . '</a></li>';
        }
        $class      = ( $this->_page == $last ) ? "disabled" : "";
        $html       .= '<li class="' . $class . '"><a href="?limit=' . $this->_limit . '&page=' . ( $this->_page + 1 ) . '">&raquo;</a></li>';
        $html       .= '</ul>';
        return $html;
    }       
}
?>


source: http://code.tutsplus.com/tutorials/how-to-paginate-data-with-php--net-2928
PHP 5 Form Part 5

PHP 5 Complete Form Example


This chapter shows how to keep the values in the input fields when the user hits the submit button.

PHP - Keep The Values in The Form

To show the values in the input fields after the user hits the submit button, we add a little PHP script inside the value attribute of the following input fields: name, email, and website. In the comment textarea field, we put the script between the <textarea> and </textarea> tags. The little script outputs the value of the $name, $email, $website, and $comment variables.
Then, we also need to show which radio button that was checked. For this, we must manipulate the checked attribute (not the value attribute for radio buttons):
Name: <input type="text" name="name" value="<?php echo $name;?>">

E-mail: <input type="text" name="email" value="<?php echo $email;?>">

Website: <input type="text" name="website" value="<?php echo $website;?>">

Comment: <textarea name="comment" rows="5" cols="40"><?php echo $comment;?></textarea>

Gender:
<input type="radio" name="gender"
<?php if (isset($gender) && $gender=="female") echo "checked";?>
value="female">Female
<input type="radio" name="gender"
<?php if (isset($gender) && $gender=="male") echo "checked";?>
value="male">Male

PHP - Complete Form Example

Here is the complete code for the PHP Form Validation Example:

<!DOCTYPE HTML>
<html>
<head>
<style>
.error {color: #FF0000;}
</style>
</head>
<body>

<?php
// define variables and set to empty values
$nameErr = $emailErr = $genderErr = $websiteErr = "";
$name = $email = $gender = $comment = $website = "";

if ($_SERVER["REQUEST_METHOD"] == "POST") {
   if (empty($_POST["name"])) {
     $nameErr = "Name is required";
   } else {
     $name = test_input($_POST["name"]);
     // check if name only contains letters and whitespace
     if (!preg_match("/^[a-zA-Z ]*$/",$name)) {
       $nameErr = "Only letters and white space allowed";
     }
   }
  
   if (empty($_POST["email"])) {
     $emailErr = "Email is required";
   } else {
     $email = test_input($_POST["email"]);
     // check if e-mail address is well-formed
     if (!filter_var($email, FILTER_VALIDATE_EMAIL)) {
       $emailErr = "Invalid email format";
     }
   }
    
   if (empty($_POST["website"])) {
     $website = "";
   } else {
     $website = test_input($_POST["website"]);
     // check if URL address syntax is valid (this regular expression also allows dashes in the URL)
     if (!preg_match("/\b(?:(?:https?|ftp):\/\/|www\.)[-a-z0-9+&@#\/%?=~_|!:,.;]*[-a-z0-9+&@#\/%=~_|]/i",$website)) {
       $websiteErr = "Invalid URL";
     }
   }

   if (empty($_POST["comment"])) {
     $comment = "";
   } else {
     $comment = test_input($_POST["comment"]);
   }

   if (empty($_POST["gender"])) {
     $genderErr = "Gender is required";
   } else {
     $gender = test_input($_POST["gender"]);
   }
}

function test_input($data) {
   $data = trim($data);
   $data = stripslashes($data);
   $data = htmlspecialchars($data);
   return $data;
}
?>


<h2>PHP Form Validation Example</h2>
<p><span class="error">* required field.</span></p>
<form method="post" action="<?php echo htmlspecialchars($_SERVER["PHP_SELF"]);?>">
   Name: <input type="text" name="name" value="<?php echo $name;?>">
   <span class="error">* <?php echo $nameErr;?></span>
   <br><br>
   E-mail: <input type="text" name="email" value="<?php echo $email;?>">
   <span class="error">* <?php echo $emailErr;?></span>
   <br><br>
   Website: <input type="text" name="website" value="<?php echo $website;?>">
   <span class="error"><?php echo $websiteErr;?></span>
   <br><br>
   Comment: <textarea name="comment" rows="5" cols="40"><?php echo $comment;?></textarea>
   <br><br>
   Gender:
   <input type="radio" name="gender" <?php if (isset($gender) && $gender=="female") echo "checked";?>  value="female">Female
   <input type="radio" name="gender" <?php if (isset($gender) && $gender=="male") echo "checked";?>  value="male">Male
   <span class="error">* <?php echo $genderErr;?></span>
   <br><br>
   <input type="submit" name="submit" value="Submit">
</form>

<?php
echo "<h2>Your Input:</h2>";
echo $name;
echo "<br>";
echo $email;
echo "<br>";
echo $website;
echo "<br>";
echo $comment;
echo "<br>";
echo $gender;
?>


</body>
</html>

PHP 5 Forms Part 4

PHP 5 Forms - Validate E-mail and URL


This chapter shows how to validate names, e-mails, and URLs.

PHP - Validate Name

The code below shows a simple way to check if the name field only contains letters and whitespace. If the value of the name field is not valid, then store an error message:
$name = test_input($_POST["name"]);
if (!preg_match("/^[a-zA-Z ]*$/",$name)) {
  $nameErr = "Only letters and white space allowed";
}
Note
The preg_match() function searches a string for pattern, returning true if the pattern exists, and false otherwise.

PHP - Validate E-mail

The easiest and safest way to check whether an email address is well-formed is to use PHP's filter_var() function.
In the code below, if the e-mail address is not well-formed, then store an error message:
$email = test_input($_POST["email"]);
if (!filter_var($email, FILTER_VALIDATE_EMAIL)) {
  $emailErr = "Invalid email format";
}

PHP - Validate URL

The code below shows a way to check if a URL address syntax is valid (this regular expression also allows dashes in the URL). If the URL address syntax is not valid, then store an error message:
$website = test_input($_POST["website"]);
if (!preg_match("/\b(?:(?:https?|ftp):\/\/|www\.)[-a-z0-9+&@#\/%?=~_|!:,.;]*[-a-z0-9+&@#\/%=~_|]/i",$website)) {
  $websiteErr = "Invalid URL";
}

PHP - Validate Name, E-mail, and URL

Now, the script looks like this:

Example

<?php
// define variables and set to empty values
$nameErr = $emailErr = $genderErr = $websiteErr = "";
$name = $email = $gender = $comment = $website = "";

if ($_SERVER["REQUEST_METHOD"] == "POST") {
  if (empty($_POST["name"])) {
    $nameErr = "Name is required";
  } else {
    $name = test_input($_POST["name"]);
    // check if name only contains letters and whitespace
    if (!preg_match("/^[a-zA-Z ]*$/",$name)) {
      $nameErr = "Only letters and white space allowed";
    }
  }

  if (empty($_POST["email"])) {
    $emailErr = "Email is required";
  } else {
    $email = test_input($_POST["email"]);
    // check if e-mail address is well-formed
    if (!filter_var($email, FILTER_VALIDATE_EMAIL)) {
      $emailErr = "Invalid email format";
    }
  }

  if (empty($_POST["website"])) {
    $website = "";
  } else {
    $website = test_input($_POST["website"]);
    // check if URL address syntax is valid (this regular expression also allows dashes in the URL)
    if (!preg_match("/\b(?:(?:https?|ftp):\/\/|www\.)[-a-z0-9+&@#\/%?=~_|!:,.;]*[-a-z0-9+&@#\/%=~_|]/i",$website)) {
      $websiteErr = "Invalid URL";
    }
  }

  if (empty($_POST["comment"])) {
    $comment = "";
  } else {
    $comment = test_input($_POST["comment"]);
  }

  if (empty($_POST["gender"])) {
    $genderErr = "Gender is required";
  } else {
    $gender = test_input($_POST["gender"]);
  }
}
?>

The next step is to show how to prevent the form from emptying all the input fields when the user submits the form.