Minggu, 28 September 2014

How to Connect your Network to DSL Line

You have your DSL modem installed, and want to have a secure connection to the Internet for your network. For that, you have to install MikroTik router between the DSL modem and your network:
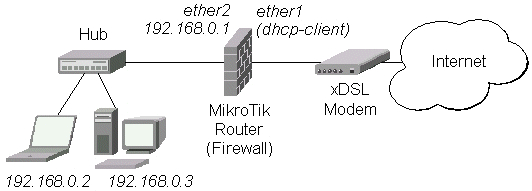
Adsl.jpg
Follow the steps below to connect your network to DSL line:
  • Make your MikroTik router with two Ethernet NICs, one for the DSL modem, one for your network.
  • When installing, make sure you install the dhcp software package, if your xDSL service provider uses DHCP to hand out IP configuration, and ppp package, if your service provider uses PPPoE for authentication and IP configuration.
  • Make sure both interfaces are enabled, for example:
/interface enable ether1,ether2
  • If your service provider uses DHCP for IP configuration, add DHCP client on the external (xDSL) interface to receive IP configuration form your service provider:
/ip dhcp-client add interface=ether1 disabled=no
  • Check, if you have received IP configuration using print detail, for example:
[admin@MikroTik] ip dhcp-client> print detail     
Flags: X - disabled, I - invalid 
 0   interface=eth1-adsl add-default-route=yes use-peer-dns=yes 
     use-peer-ntp=yes status=bound address=81.198.55.240/22 
     gateway=81.198.52.1 dhcp-server=81.198.232.1 primary-dns=80.232.169.11 
     secondary-dns=195.122.1.59 expires-after=5h5m46s 
  • If your service provider uses PPPoE for authentication and IP configuration, add PPPoE client to dial out to the service providers PPPoE server and receive IP configuration:
/ interface pppoe-client 
add interface=ether1 user="mtrouter@adsl.com" password="bunny" \
add-default-route=yes use-peer-dns=yes disabled=no
  • Check if you have received IP configuration:
[admin@MikroTik] interface pppoe-client> monitor pppoe-out1 
        status: "connected"
        uptime: 1m17s
     idle-time: 0s
      encoding: "MPPE128 stateless"
  service-name: "home_dsl"
       ac-name: "Telco_DSL"
        ac-mac: 00:0C:42:05:03:99
           mtu: 1480
           mru: 1480
  • Add your private network address to ether2 interface, for example:
/ip address add address=192.168.0.1/24 interface=ether2
  • Configure masquerading for your local network:
/ip firewall nat add chain=srcnat src-address=192.168.0.0/24 action=masquerade
  • Configure firewall to protect your router:
/ ip firewall filter
add chain=input connection-state=established comment="Accept established connections"
add chain=input connection-state=related comment="Accept related connections"
add chain=input connection-state=invalid action=drop comment="Drop invalid connections" 
add chain=input protocol=udp action=accept comment="UDP" disabled=no 
add chain=input protocol=icmp limit=50/5s,2 comment="Allow limited pings" 
add chain=input protocol=icmp action=drop comment="Drop excess pings" 
add chain=input in-interface=ether2 src-address=192.168.0.0/24 comment="From our LAN" action=accept
add chain=input action=log log-prefix="DROP INPUT" comment="Log everything else"
add chain=input action=drop comment="Drop everything else"
  • (Optional) Run DHCP Setup to configure DHCP server to hand out IP configuration on your home network:
/ip dhcp-server setup
  • (Optional) Enable local DNS cache to be used when resolving DNS requests from home computers:
/ip dns set allow-remote-requests=yes
That's it! You can access the Internet from your network!

Upload File Menggunakan File Manager di Cpanel IDWebhost

1. Pertama buka Cpanel dari domain anda atau ketik http://domainanda.com/cpanel/


2. Masukkan username dan password untuk login ke cpanel diatas. User dan password sama dengan user dan password untuk login ftp.
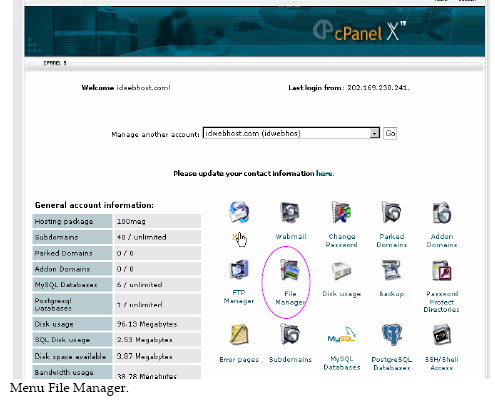
3. kemudian klik pada menu ʺFile Managerʺ

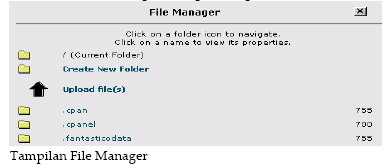
4. Setelah masuk di File Manager maka tampak tampilan seperti berikut

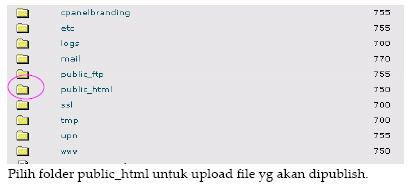
Agar file anda bisa diakses oleh pengunjung website anda, maka upload semua file yang hendak Anda tampilkan ke folder public_html seperti yg ditunjukkan dibawah. Klik icon foldernya bukan tulisan ”public_html” (klik pada tulisan untuk memunculkan menu di sebelah kanan).

5. Untuk mengupload file silahkan klik Upload File seperti di bawah ini. Anda perlu untuk membuat file bernama index.htm, index.html, atau index.php agar saat situs Anda diakses file tersebut yang akan ditampilkan.

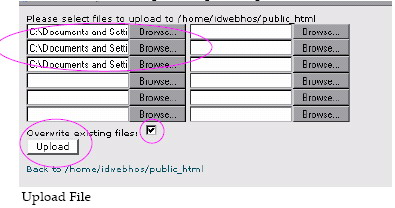
6. Setelah itu akan tampak tampilan seperti berikut

Pilih file yang akan diupload yang Anda inginkan. Browse di mana file tersebut disimpan di komputer Anda. Beri tanda jika akan menumpuki file yang sebelumnya sudah ada di web kita. Kemudian klik upload.
7. Untuk lebih mudahnya, kami sarankan Anda software FTP untuk meng upload file‐file Anda (login dan password sesuai dengan yang telah disebutkan diatas) software FTP gratis dapat di downlowad di http://filezilla.sourceforge.net. Adapun manual mengenai upload dengan filezilla, dapat dilihat di manual lain di idwebhost ini.
8. Selamat mencoba!!! Salam IDWebhost !!! ☺

Setting Mikrotik PPPoE

Open Winbox and Klik the square box from Connect To. Choose IP address or MAC Address prompt, login with username : admin and leave the password blank by default, then klik Connect.

 
Select PPP and choose the PPPoE Client from Interfaces, input Biznet in Name field (optional) and choose the Interface which connected to Biznet cable.


 Enter username and password provided by ISP in Dial Out tab, klik Apply and then OK.


 To see the internet status choose Status tab, select IP > Addresses to see WAN IP Address from ISP

.
 To Setup DNS choose IP > DNS > klik Settings

 
 Done.


Selasa, 16 September 2014

Cara Konek Server Database Alfapos

Cara Konek Server Database Alfapos

Konek Database Server dan Client pada Alfapos

Helloo.. bro dan sista sekalian, bagi kalian yang belum bisa mengkoneksikan Database Alfapos, disini saya sedikit berbagi ilmu dengan kalian, namun sebelumnya perjuangan saya untuk bisa mengkoneksikan server dan client Alfapos ini banyak menelan korban..hehehehe, koq korban sih, ahh maksud saya korbannya kopimix hingga menelan sekitar 100 sachet, obat sakit kepala 1 strip, obat mual-mual 1 strip, hahahaha, bercanda, OK kita langsung saja ya, sebelumnya saya mau jelaskan sedikit tentang program kasir Alfapos ini, software ini adalah software kasir yg menurut saya cukup powerfull dan handal, sebab program ini sudah komplit, data penjualan tokcer habis, laporan penjualan dan pembelian cukup akurat dan detail, laporannya juga bisa diimport ke excel lho.., user interfacenya yang simpel dan mudah dimengerti, dan yang paling hebatnya adalah input master data barang dan stoknya, bisa dibuat di excel kemudian dieksport ke dalam program, ohh yaa, program ini juga sudah support dengan barcode scan, pilihan model struk yang bermacam2, sehingga kita bisa mengaturnya sesuai selera kita..dsb..dsb.
bagi yang ingin mencoba software ini bisa di download dari website :
http://ptalfasoft.com/downloads/

Sekarang mari kita melihat bagaimana cara membuat koneksi antara server dan client software kasir ini.
1. Software Alfapos sudah terinstall di komputer (saya sarankan install pada OS Windows XP)
2. Setelah terinstall, dan kalian sudah membuat database baru serta menentukan lokasi database baru anda, saran saya sih save database pada directory D:\
3. Untuk komputer server, pengaturan databasenya dengan cara masuk ke alfapos, pilih jendela tab administrator, lalu pilih setup alfaPOS, kemudian pilih database, pada lokasi database pilih "Di Komputer Ini"
pada nama file silahkan klik icon folder di samping kolom isian, dan cari lokasi database anda tadi, kemudian klik simpan.

 4.  Pada komputer client yang juga sudah terinstall alfapos, pertama klik kiri start, lalu klik run, kemudian ketikkan odbcad32, kemudian enter

5. Pada tab User DSN, pilih Add, dan akan muncul tampilan seperti ini

6. Cari dan pilih Firebird/InterBase(r) driver, kemudian klik finish selanjutnya kalian akan dihadapkan pada tampilan seperti ini

7. pada kolom "Data Source Name (DSN)" isi "firebird dsn", pada kolom "Driver" pilih IscDbc, pada kolom "Description" isi sesuai selera anda, misalnya "firebird database on localhost", pada kolom "Database" klik tombol browse disamping, kemudian pilih lokasi database yang sudah di copy dari komputer server, misalnya pada server letak lokasi database ada pada D:\alfapos\database\testing.adb, maka copykan database testing.adb itu ke komputer client, saran saya samakan lokasinya di client yaitu di D:\alfapos\database\testing.adb, nah kita lanjut pada kolom Database (lihat gambar diatas), anda sdh memilih lokasi database, maka tambahkan ketikkan localhost: didepan lokasi tadi, contoh : localhost:D:/alfapos/database/testing.adb, kemudian pada kolom "client" dikosongkan saja, pada kolom "Database Account" ketikkan SYSDBA, pada kolom "Password" ketikkan masterkey, pada baris Options-transaction pilih dan centang "read (default write)", pengaturan yang lain biarkan seperti semula, kemudian klik OK.

8. Jika kalian benar melakukan langkah-langkah di atas maka akan muncul di User DSN seperti gambar ini dan anda tinggal OK saja


 9. Sekarang koneksi odbcad firebird komputer client anda sudah berhasil.
10. Sekarang buka alfapos, pada komputer client kemudian masuk di administrator, pilih setup alfapos, pilih database, pada lokasi database pilih "Di Komputer Lain", protokol pilih TCP/IP, Nama Komputer ketikkan IP komputer server anda, misalnya 192.168.1.211(jika komputer server anda punya IP yaitu 192.168.1.211), Port pilih 3050, nama file pilih sesuai lokasi database anda misalnya D:\alfapos\database\testing.adb, setelah itu coba klik "Test Koneksi", jika koneksi berhasil maka koneksi server dan client sudah berhasil kalian buat, namun jika gagal, coba ulangi langkah-langkah diatas secara seksama, tidak usah terburu-buru, nyantai aja coy...
11. Selamat..!! anda sudah BERHASIL membuat koneksi database antara client dan server pada Alfapos.
 
 
source: http://deddybella.blogspot.com/2014/01/cara-konek-server-database-alfapos.html

Senin, 15 September 2014

Enable Built-in Administrator Account


First you’ll need to open a command prompt in administrator mode by right-clicking and choosing “Run as administrator” (or use the Ctrl+Shift+Enter shortcut from the search box).
image
If you are in Windows 8.x you can right-click on the Start button and choose to open a command prompt that way.

Now type the following command:
net user administrator /active:yes

image
You should see a message that the command completed successfully. Log out, and you’ll now see the Administrator account as a choice. (Note that the screenshots are from Vista, but this works on Windows 7 and Windows 8)
image
You’ll note that there’s no password for this account, so if you want to leave it enabled you should change the password.
Disable Built-in Administrator Account
Make sure you are logged on as your regular user account, and then open an administrator mode command prompt as above. Type the following command:
net user administrator /active:no
image
The administrator account will now be disabled, and shouldn’t show up on the login screen anymore.


source: http://www.howtogeek.com/howto/windows-vista/enable-the-hidden-administrator-account-on-windows-vista/