Sabtu, 29 Desember 2012

Best Free Image Websites


Your blog is a representation of who you are so it should be unique, right? The only problem is most free Blogger templates (if not all) are available to anyone so chances of you stumbling across another site that looks very similar to yours is going to be high. It’s like going to a party and bumping into another girl who’s wearing the exact same dress as you. It’s something you hate and try to avoid.
The good news is you can easily make your Blogger site unique just by changing or adding a header image. Usually that move alone will make your blog stand out from the crowd (as well as customizing your sidebar widgets).
free blogger header images
So here’s a couple header image sites I’d like to recommend to help you dress up and personalize your blog.
  1. 45 Free Beautiful Blog Headers – This is a great list compiled by Smashing Magazine. Some of the headers include the .psd source files so you can really customize the header if you’ve got Photoshop experience.
  2. Free Webpage Headers – A very nice collection of hundreds of 800 x 200 website headers which can easily be used for Blogger. Images are organized by category which makes it much easier to find what you’re looking for.
  3. Dreamstime – This is actually a pay for image site but they have a free images section you can benefit from. Click on the “Free Images” tab once you get to their home page.
  4. stock.xchng – By looking at the name of their site you wouldn’t think it was any good but looks can be deceiving. They’ve got thousands of free images that would work for your blog header or for inserting them into a blog post.
  5. Stock Vault – This free image site is dubbed the stock photo sharing website where designers and photographers can meet to share their images. Decent selection and more targeted towards designers but you might be able to find some goodies for your blog.
  6. FreeFoto – This last one is a bonus since the list was only supposed to be 5. It’s a pretty good site where you can find all sorts of images for your blog header, etc.

Top 10 Great Blog Traffic

10. Write at least five major “pillar” articles. A pillar article is a tutorial style article aimed to teach your audience something. Generally they are longer than 500 words and have lots of very practical tips or advice. This article you are currently reading could be considered a pillar article since it is very practical and a good “how-to” lesson. This style of article has long term appeal, stays current (it isn’t news or time dependent) and offers real value and insight. The more pillars you have on your blog the better.
9. Write one new blog post per day minimum. Not every post has to be a pillar, but you should work on getting those five pillars done at the same time as you keep your blog fresh with a daily news or short article style post. The important thing here is to demonstrate to first time visitors that your blog is updated all the time so they feel that if they come back tomorrow they will likely find something new. This causes them to bookmark your site or subscribe to your blog feed.
You don”t have to produce one post per day all the time but it is important you do when your blog is brand new. Once you get traction you still need to keep the fresh content coming but your loyal audience will be more forgiving if you slow down to a few per week instead. The first few months are critical so the more content you can produce at this time the better.
8. Use a proper domain name. If you are serious about blogging be serious about what you call your blog. In order for people to easily spread the word about your blog you need a easily rememberable domain name. People often talk about blogs they like when they are speaking to friends in the real world (that”s the offline world, you remember that place right?) so you need to make it easy for them to spread the word and pass on your URL. Try and get a .com if you can and focus on small easy to remember domains rather than worry about having the correct keywords (of course if you can get great keywords and easy to remember then you’ve done a good job!).
7. Start commenting on other blogs. Once you have your pillar articles and your daily fresh smaller articles your blog is ready to be exposed to the world. One of the best ways to find the right type of reader for your blog is to comment on other people’s blogs. You should aim to comment on blogs focused on a similar niche topic to yours since the readers there will be more likely to be interested in your blog.
Most blog commenting systems allow you to have your name/title linked to your blog when you leave a comment. This is how people find your blog. If you are a prolific commentor and always have something valuable to say then people will be interested to read more of your work and hence click through to visit your blog.
6. Trackback and link to other blogs in your blog posts. A trackback is sort of like a blog conversation. When you write a new article to your blog and it links or references another blogger”s article you can do a trackback to their entry. What this does is leave a truncated summary of your blog post on their blog entry – it”s sort of like your blog telling someone else’s blog that you wrote an article mentioning them. Trackbacks often appear like comments.
This is a good technique because like leaving comments a trackback leaves a link from another blog back to yours for readers to follow, but it also does something very important – it gets the attention of another blogger. The other blogger will likely come and read your post eager to see what you wrote about them. They may then become a loyal reader of yours or at least monitor you and if you are lucky some time down the road they may do a post linking to your blog bringing in more new readers.
5. Encourage comments on your own blog. One of the most powerful ways to convince someone to become a loyal reader is to show there are other loyal readers already following your work. If they see people commenting on your blog then they infer that your content must be good since you have readers so they should stick around and see what all the fuss is about. To encourage comments you can simply pose a question in a blog post. Be sure to always respond to comments as well so you can keep the conversation going.
4. Submit your latest pillar article to a blog carnival. A blog carnival is a post in a blog that summarizes a collection of articles from many different blogs on a specific topic. The idea is to collect some of the best content on a topic in a given week. Often many other blogs link back to a carnival host and as such the people that have articles featured in the carnival often enjoy a spike in new readers.
To find the right blog carnival for your blog, do a search at blogcarnival.com.
3. Submit your blog to blogtopsites.com. To be honest this tip is not going to bring in a flood of new readers but it”s so easy to do and only takes five minutes so it”s worth the effort. Go to Blog Top Sites, find the appropriate category for your blog and submit it. You have to copy and paste a couple of lines of code on to your blog so you can rank and then sit back and watch the traffic come in. You will probably only get 1-10 incoming readers per day with this technique but over time it can build up as you climb the rankings. It all helps!
2. Submit your articles to EzineArticles.com. This is another tip that doesn’t bring in hundreds of new visitors immediately (although it can if you keep doing it) but it”s worthwhile because you simply leverage what you already have – your pillar articles. Once a week or so take one of your pillar articles and submit it to Ezine Articles. Your article then becomes available to other people who can republish your article on their website or in their newsletter.
How you benefit is through what is called your “Resource Box”. You create your own resource box which is like a signature file where you include one to two sentences and link back to your website (or blog in this case). Anyone who publishes your article has to include your resource box so you get incoming links. If someone with a large newsletter publishes your article you can get a lot of new readers at once.
1. Write more pillar articles. Everything you do above will help you to find blog readers however all of the techniques I’ve listed only work when you have strong pillars in place. Without them if you do everything above you may bring in readers but they won’t stay or bother to come back. Aim for one solid pillar article per week and by the end of the year you will have a database of over 50 fantastic feature articles that will work hard for you to bring in more and more readers.
I hope you enjoyed my list of traffic tips. Everything listed above are techniques I’ve put into place myself for my blogs and have worked for me, however it”s certainly not a comprehensive list. There are many more things you can do. Finding readers is all about testing to see what works best for you and your audience and I have no doubt if you put your mind to it you will find a balance that works for you.
This article was written by a guest blogger by the name of Yaro Starak who is a professional blogger and my blog mentor. He is the leader of the Blog Mastermind mentoring program designed to teach bloggers how to earn a full time income blogging part time.
To get more information about Blog Mastermind click this link:
www.BlogMastermind.com

Improve Your Google Rankings in One Easy Step


seo your websiteHaving a top rank in Google is the holy grail for anyone who has a website. Organic Google traffic is free advertising and how most bloggers (especially those just starting out) achieve visitors and traffic to their site. It all comes down to a simple numbers game. Essentially, more traffic = more money-making opportunities from your blog. The question is, how do you get ranked higher for my blog posts using Blogger?
Before I tell you how, let me give you a quick lesson is search engine optimization (aka SEO). There are two main components: “off-page” and “on-page” optimization. “Off-page” SEO refers to tactics such as link building. The more websites that point their links to your blog/website, the better. It’s a democratic way of showing Google that your site must be important if lots of people are pointing to it. Even more important with “off-page” inbound links is the actual link text (anchor text) that is used to point to your site.
Here’s my proof. If you search Google for the term “click here” you’ll see that Adobe Reader and Apple’s Quicktime software are in the top 3 results. Why? Because so many other sites are linking to these two sites with “click here” as the anchor text to download their software. That’s the power of “off-page” SEO which you as a blogger can’t do much about besides writing such great unique content that generates lots of links.
So with “on-page” SEO you have complete control over how well you’re optimized for Google. This includes keywords in your post titles, title tags, using header tags (h1, h2) and other tactics. Now the one we’re going to focus on in this article is the blog title tag.
Title tags are one of the most (if not the most) important “on-page” elements to ranking high in Google. Search engines such as Google weigh the importance of each word in the title from left to right. So ideally you want your blog post title all the way to the left and your actual blog name to the right. Below is a perfect example of how this should look. You can also check out our Premium Revolution Template which is currently using this technique as well.

blogger seo title
Blogger templates by default don’t come with search engine optimized (SEO) title tags meaning you aren’t maximizing your blog to rank better in Google. If you take a look at your existing Blogger title you’ll see that blogger displays the blog name first then followed by your post title. They have it backwards so let’s get your blog setup properly.
We’re going to have to make a quick edit to your Blogger template which might intimidate some of you but it’s very small and painless. All I ask you to do first is to backup your template just in case you make a boo boo. That makes it easy to revert back without much headache.

Step #1

In your Blogger dashboard, go to “Layout” => “Edit HTML”.

Step #2

In the template code, do a search for this: <title><data:blog.pageTitle/></title>. It’s usually in the first 5-10 lines of code in your template near the top.

Step #3

Replace that bit of code with the following code:
<b:if cond='data:blog.pageType == &quot;index&quot;'>
<title><data:blog.title/></title>
<b:else/>
<title><data:blog.pageName/> | <data:blog.title/></title>
</b:if>

Step #4

Save your template and go back to your blog. Click into any individual post and look at the page title.
All your blogger posts are now much better optimized to rank higher in Google. I’m not going to promise you a night and day difference but you’ve taken a step in the right direction. Now just go post unique high quality content so people searching Google will find your blog first!

Rabu, 26 Desember 2012

Kisah Azazil hingga menjadi Iblis

`Azâzîl (Arab: عزازل ‘Azāzīl, Inggris: Azazel, Izazil) adalah nama asli dari Iblis[1] yang merupakan bapak dari bangsa jin,[2]sedangkan pendapat lain mengatakan bahwa nama asli Iblis adalah al-Harits.[1] Menurut syariat Islam `Azâzîl adalah pemimpin kelompok syaitan dari kalangan jin dan manusia.
Sebelum diciptakannya Adam, Azâzîl pernah menjadi Imam para Malaikat (Sayyid al-Malaikat)[3][4] dan Khazin al-Jannah (Bendaharawan Surga), selama beberapa puluh ribu tahun sebelum membangkang kepada Allah. Nama Azazil dapat ditemukan dalam beberapa kitab tafsir, diantaranya dalam kitab Tafsir Ibnu Katsir, (Mujallad I-1/76 – 77), Tafsir Al- Khozin – Tafsir Al- Baghowi (I-1/48).

Dari Wahab: Tuhan semesta alam menciptakan api Sammun (yang sangat panas). Dari Api Sammun Dia menciptakan jin. "Dan Kami telah menciptakan jin sebelum (Adam) dari api yang sangat panas" (Al-Hijr.27)
Jin Pertama yang diciptakan bernama Marij dan diciptakan pula Istrinya yang bernama Marija. Mereka memiliki seorang putra dan mereka memanggilnya Jin. Dari mereka berasal semua bangsa jin, termasuk Azazil/Iblis.

Dan Tuhan memberi mereka bumi untuk tempat. Dan mereka tinggal dan beribadah di sana untuk waktu yang lama. Karena begitu banyak ibadah mereka, para malaikat menjadi kagum seraya berkata kepada Tuhan langit dan bumi, "Oh Tuhan kami, angkatlah mereka ke surga, agar kami bisa belajar dari mereka dan mengikuti contoh baik mereka". Maka diangkatlah Azazil hingga berada di antara para malaikat dan dia tinggal bersama mereka di langit pertama. Bangsa Jin selain Azazil tetap tinggal di bumi, sementara sejumlah dari mereka ada yang tetap berbuat baik dan ada juga yang berbuat berdosa serta melanggar hukum.

Dan bumi mulai mengeluh kepada Tuhan. "Oh Tuhanku, Apakah Engkau menciptakanku untuk dihuni oleh bangsa kafir?" . Tuhan menjawab "Wahai bumi, bersabarlah, akan Aku kirimkan para Nabi untuk memimpin mereka kembali ke jalan yang lurus."  Tuhan mengirimkan kepada mereka 800 nabi dan mereka semua dibunuh oleh bangsa jin kafir. Akhirnya Tuhan berbicara kepada Azazil di surga pertama. Dan Dia berkata kepadanya "Pergilah Azazil. Pergi dan lawanlah kaum kafir dari bangsamu sendiri yang ada di bumi. Azazil patuh dan turun ke bumi dan melawan kaum kafir, menaklukkan mereka maka Tuhan menurunkan api dari langit sehingga mereka (kaum kafir) hancur tanpa bekas. Yang masih dibiarkan hidup dari bangsa jin, hanya yang masih mau beribadah kepada Allah SWT. (sumber : LORE of Light: Stories from the lives of the Prophets)
AzazelDi dalam salah satu kitab Imam al-Ghozali disebut bahwa Azazil rupanya menawan mempunyai empat sayap dan mempunyai banyak ilmu dan terbanyak dalam ber-ibadah hingga mengalahkan ilmu serta ibadah malaikat-malaikat yang lain.
Azazil kebanggaan dan pemimpin para malaikat. Doa Azazil juga mustajab. Masih banyak lagi yang lain tentang sebutan kehormatan buat Azazil, seperti :
  1. Lapisan langit pertama (Ar-Rafii’ah), ia dijuluki Al-Abid yaitu ahli ibadah yang mengabdi luar biasa kepada Allah.
  2. Lapisan langit kedua (Al-Maa’uun), ia dijuluki Ar-Raki artinya ahli ruku kepada Allah.
  3. Lapisan langit ketiga (Al-Maziinah), ia dijuluki As-Saajid artinya ahli sujud kepada Allah.
  4. Lapisan langit keempat (AZ-Zahirah), ia dijuluki Al-Khaasyi artinya karena selalu merendah dan takluk kepada Allah.
  5. Lapisan langit kelima (A,-Muniirah). Ia dijuluki sebagai Al-Qaanit, karena ketaatanya kepada Allah.
  6. Lapisan langit keenam (Al-Khaliishah), ia dijuluki Al-Mujtahid, artinya bersungguh-sungguh ketika beribadah kepada Allah.
  7. Lapisan langit ketujuh (Al-Ajiibah) ia dijuluki Az-Zahid, yaitu kesederhanaan dalam menggunakan sarana hidup.
Pada suatu ketika saat malaikat Israfil berkeliling surga ia mendapati tulisan di pintu surga “Seorang hamba Allah yang telah lama mengabdi akan mendapat laknat dengan sebab menolak perintah Allah “.
Tulisan yang tertera di salah satu pintu surga itu membuat Israfil menangis, Ia takut itu adalah dirinya. Para malaikat yang lain juga menangis dan punya ketakutan yang sama dengan Israfil.  Mereka lalu sepakat untuk mendatangi Azazil yang dikenal dengan doanya yang mustajab.
Ketika mendengar penjelasan Israfil, Azazil berkata :”Ya Allah ! Hambamu yang mana yang berani menentang perintah-Mu…, sungguh aku ikut melaknatnya”.
Lalu Azazil memanjatkan doa : “Ya Allah lindungi mereka dari laknat Mu”.
Azazil lupa ia juga hamba Allah dan tak menyadari bahwa kata hamba di salah satu pintu surga itu bisa menimpa siapa saja termasuk dirinya.
Azazil tidak mendoakan dirinya.
Hingga tibalah ketika pada suatu waktu para malaikat di panggil atas undangan Allah.
Ketika itu, Allah, Zat pemilik kemutlakan dan semua niat mengutarakan maksud untuk menciptakan pemimpin di bumi.
“Sesungguhnya Aku hendak menciptakan seorang khalifah (pemimpin) di muka bumi,” begitulah firman Allah.
Semua malaikat hampir serentak menjawab mendengar kehendak Allah. “Ya Allah, mengapa Engkau hendak menjadikan khalifah di muka bumi, yang hanya akan membuat kerusakan dan menumpahkan darah di bumi padahal kami senantiasa bertasbih dengan memuji Engkau dan menyucikan Engkau?”
Allah menjawab kekhawatiran para malaikat dan meyakinkan bahwa, “Sesungguhnya Aku mengetahui apa yang tidak kamu ketahui.”
Allah lalu menciptakan manusia pertama yang diberi nama Adam. Kepada para malaikat, Allah memperagakan kelebihan dan keistimewaan Adam, yang menyebabkan para malaikat mengakui kelebihan Adam atas mereka.
Lalu Allah menyuruh semua malaikat agar bersujud kepada Adam, sebagai
wujud kepatuhan dan pengakuan atas kebesaran Allah. Seluruh malaikat pun bersujud, kecuali Azazil.
Sebagai penghulu para malaikat dengan semua gelar dan sebutan kemuliaan, Azazil merasa hanya pantas bersujud kepada Allah dan tak pantas bersujud pada makhluk lain termasuk Adam karena merasa penciptaan dan statusnya yang lebih baik walaupun itu atas perintah Allah.
Allah melihat tingkah dan sikap Azazil, lalu bertanya
“Hai Iblis, apakah yang menghalangimu untuk bersujud kepada yang telah Kuciptakan dengan kedua tanganKu. Apakah kamu menyombongkan diri (takabur) ataukah kamu merasa termasuk orang-orang yang lebih tinggi?” kata Allah sembari memberi gelar baru buat Azazil yaitu Iblis.
Mendengar pernyataan Allah, bukan permintaan ampun yang keluar dari Azazil, sebaliknya ia malah menantang dan berkata:
“Ya Allah, aku (memang) lebih baik dibandingkan Adam. Engkau ciptakan aku dari api, sedangkan Adam Engkau ciptakan dari tanah”.
Mendengar jawaban Azazil yang sombong,
Allah berfirman. “Keluarlah kamu dari surga. Sesungguhnya kamu adalah
orang-orang yang diusir”.
Dengan seketika Allah merubah mukanya yang asalnya sangat indah cemerlangan menjadi bentuk seburuk-buruk rupa. Allah merubah kepalanya seperti kepala unta, dadanya seperti daging yang menonjol di atas punggung, wajah yang ada di antara dada dan kepala itu seperti wajah kera, kedua matanya terbelah pada sepanjang permukaan wajahnya. Lubang hidungnya terbuka seperti cerek tukang bekam, kedua bibirnya seperti bibir lembu, taringnya keluar seperti taring babi hutan dan janggut terdapat sebanyak tujuh helai.
Kemudian Azâzîl memohon kepada Allah:
Berkata iblis: Ya Tuhanku, (kalau begitu) maka beri tangguhlah kepadaku sampai hari (manusia) dibangkitkan.(Al-Hijr, 15:36)
Lalu Allah menjawab: “ Sesungguhnya Aku pasti akan memenuhi neraka Jahanam dengan jenis kamu dan dengan orang-orang yang mengikuti kamu di antara mereka kesemuanya”.
Azâzîl diberi umur hingga hari akhir kiamat. Dengan janji untuk  menyesatkan Adam dan anak cucunya seluruhnya, kecuali hamba-hamba Allah yang mukhlis di antara mereka.
Selama 120 ribu tahun beribadah, Azazil si penghulu para malaikat dan si bendaharawan surga juga menyandang semua gelar kehormatan dan kemuliaan di tiap lapisan surga, dan selama 70 ribu tahun ia menjadi penyembah Allah yang paling taat. Karena kesombongannya maka tiadalah guna ibadah yang sangat luar biasa tersebut.
Kesombongan Azazil :
  1. Keyakinan Azazil kepada dirinya sendiri adalah hamba Allah yang paling taat. Bahkan saat itu Azazil turut melaknat hamba Allah yang  menolak perintah Allah. Ketika ia mendoakan para malaikat agar tidak dilaknat oleh Allah ia tidak mendoakan dirinya sendiri karena keyakinannya bahwa tidak mungkin di laknat oleh Allah disebabkan ibadahnya yang melebihi para malaikat yang lain.
  2. Dikarenakan gelar kehormatan dan kemuliaan yang banyak ia dapat dari penduduk surga dan penciptaannya dari api sedangkan Adam dari tanah yang mana ia merasa lebih mulia api dari tanah hingga ia merasa tidak pantas untuk sujud kepada Adam walaupun atas perintah Allah.
Dapatlah dipetik hikmah, walau bagaimanapun kita semua telah berusaha dengan sebanyak-banyaknya usaha, sebanyaknya banyak bekerja dan sebanyak-banyaknya beribadah tetaplah jangan yakin akan keberhasilan yang di dapat baik itu keberhasilan untuk mendapatkan duniawi bahkan surgawi tampa pertolongan dari Allah. Jangan pernah lupa untuk memohon agar mendapatkan pertolongan Allah swt dan jangan pernah ingkar atas perintah Allah. Amin.
Senin, 24 Desember 2012

Cara Memperbaiki Power Supply Unit (PSU) Komputer

Untuk melanjutkan artikel saya mengetai tes kerusakkan pada power supply unit (PSU), maka kali ini saya akan membahas “Cara Memperbaiki Power Supply Unit (PSU). Apakah anda mempunyai power supply unit (PSU) komputer yang sudah tidak bisa hidup/rusak.
Jika anda mempunyai power supply  unit yang rusak dan anda mempunyai waktu senggang, cobalah anda memberanikan diri untuk memperbaiki power supply tersebut. 

PSU komputer adalah power supply dengan sistem switching. Pada power supply switching, kebanyakan yang rusak adalah komponen yang berada pada bagian primer.

Peralatan yang digunakan, yaitu :
  1. Obeng Plus (+)
  2. Solder
  3. Timah
  4. Penyedot timah
  5. Avometer / Multimeter
  6. Komponen-komponen yang diperlukan / komponen yang rusak pada power supply

Kalau sudah siap, langsung saja buka tutup casing Power supply unit dengan menggunakan obeng plus (+), kemudian lepaskan papan rangkaian (PCB) dari casingnya. Setelah papan rangkainan (PCB) dilepaskan dari casing, coba anda lihat semua komponen yang ada di papan rangkainan power supply.

Beberapa komponen yang perlu diselidiki, yaitu :

Langkah pertama Cek Sekring (Fuse)
Sekering (fuse) adalah alat pemutus rangkaian, karena dengan adanya pemakainan arus yang berlebihan. terjadinya arus yang berlebihan dalam suatu rangkaian, bisa disebankan karena faktor kenaikan beban atau adanya hubungan singkat. Sekring (Fuse) disebut sebagai alat pengaman, karena digunakan untuk melindungi perangkat dan manusia dari bahaya yang ditimbulkan oleh kerusakan listrik.

Coba anda cek sekering dengan multimeter, jika sekring putus silakan ganti sekring dengan sekring baru yang sama nilainya dengan sekring yang lama. Setelah diganti sekring lama dengan yang baru dan nilainya sama dengan yang lama, maka coba anda hubungkan PSU ke listrik PLN. Jika sekring putus lagi, berarti transistor regulatornya jebol/short/rusak. Lepaskan steker dari stop kontak anda.

Langkah kedua Cek Dioda
Dioda adalah komponen aktif bersaluran dua (diode termionik mungkin memiliki saluran ketiga sebagai pemanas). Dioda mempunyai dua elektrode aktif dimana isyarat listrik dapat mengalir, dan kebanyakan diode digunakan karena karakteristik satu arah yang dimilikinya. Dioda varikap (VARIable CAPacitor/kondensator variabel) digunakan sebagai kondensator terkendali tegangan. Fungsi paling umum dari diode adalah untuk memperbolehkan arus listrik mengalir dalam suatu arah (disebut kondisi panjar maju) dan untuk menahan arus dari arah sebaliknya (disebut kondisi panjar mundur). Karenanya diode dapat dianggap sebagai versi elektronik dari katup pada transmisi cairan.

Cek dioda dengan cara melepaskan dioda dengan menggunakan solder dan kemudian cek dengan multimeter. Dioda yang masih bagus yakni hanya mengalirkan arus listrik pada satu arah saja, ukur dioda bolak balik, jika tembus silakan ganti dengan dioda yang sama dengan ukurannya.

Langkah ketiga Cek Kapasitor (Elco)
Kapasitor adalah komponen elektronika yang berfungsi menyimpan muatan listrik. Kapasitor polar memiliki dua kutub yang berbeda pada kakinya (-/+), sehingga dalam pemasangannya tidak boleh terbalik. Kapasitor polar biasa disebut juga dengan nama elco, satuan yang digunakan untuk mengetahui nilai kapasitas sebuah elco adalah uF(mikro Farad). Tiap elco memiliki tegangan kerja yang berbeda-beda, biasanya batas maksimal tegangan yang diperbolehkan untuk sebuah elco tertulis pada bodynya. Tegangan kerja pada elco dinyatakan dalam volt. Apabila sebuah elco memiliki nilai 10uF/25volt, itu artinya elco tersebut bernilai 10 mikro Farad dan memiliki batas maksimum tegangan 25 volt.

Elco ini bentuk fisiknya seperti tabung, apabila terdapat kerusakan (melembung) pada kepala elko maka dipastikan 80 % sudah rusak atau sudah rusak parah. Ganti elko tersebut dengan kapasitas yang sama. Jika tidak ditemukan kerusakkan fisik maka kita dapat mengeceknya dengan cara melepaskan elco dengan menggunakan solder dari papan rangkaian dan gunakan multimeter untuk mengukur kapasitas elco tersebut. Apabila kapasitasnya kurang atau melebihi kapasitas toleransi lebih baik kita menggantinya. Hati-hati dalam memasang, jangan sampai terbalik antara positif (+) dan negatif (-).

Langkah keempat Cek Transistor regulator
Transistor merupakan komponen elektronik yang cara kerjanya bisa di analogikan sebagai resistor pada Collector dan Emiiternya, yang nilainya, tergantung pada seberapa arus kecil yang melewati Base ke Emitter untuk transistor jenis NPN dan dari Emitter ke Base untuk transistor jenis PNP. Dengan prinsip ini, maka transistor bisa digunakan sebagai penguat, yaitu dengan memberikan arus berubah kecil antara Base dan Emitternya (atau sebaliknya untuk PNP) yang akan menghasilkan nilai resistor yang berubah secara besar, sehingga bisa memperkuat arus maupun tegangan.
Fungsinya sebagai penguat ini yang dikembangkan menjadi rangkaian osilator, rangkaian regulator dan sebagainya.

Transistor ini dipasang pada aluminium dan transistor ini terletak dekat dengan komponen elco besar. Untuk mengecek transistor yakni dengan cara melepaskan transistor dari papan rangkaian (PCB) dengan menggunakan solder, cek komponen transistor dengan multimeter. Jika kaki emitor dan kolektor tersambung, berarti transistor tersebut jebol/putus/rusak. Silakan ganti transistornya dengan yang baru dan harus sama kapasitasnya dengan yang lama.
Jika transistor regulator jebol/rusak, periksa juga komponen yang berada di dekat transistor regulator tersebut. Karena biasanya komponen yang berada di jalur transistor regulator akan ikut jebol/putus/nilainya berubah.Komponen yang mempengaruhi itu adalah dioda dan resistor.Jika ada yang jebol/putus/nilainya berubah, silakan ganti dengan komponen yang masih bagus.

Langkah kelima Cek IC B0813
IC (Integrated Circuit) adalah komponen semikonduktor ekuivalensi dari ratusan atau ribuan komponen lain. tetapi IC mempunyai komponen terpisah, rangkaian dibentuk pada sekeping kecil silikon. Dengan cara ini rangkaian yang sangat sulit dapat dibuat pada ruangan yang sangat kecil.

Jika anda sudah yakin power supply unit anda sudah baik, silakan hubungkan ke stop kontak. Ukur tegangan pada kabel warna ungu terhadap Ground (kabel warna hitam), ukur dengan menggunakan avometer, jika ada tegangan 5 volt yang terbaca pada multimeter, berarti sudah ada titik terang power supply anda anda akan hidup lagi.

Hubungkan kabel yang berwarna hitam ke kabel yang berwarna hijau. Hubungkan dengan menggunakan kabel jumper/konektor yang anda punya (sudah di bahas di artikel “Tes Kerusakan Power Supply Unit”). Jika PSU anda berjalan normal, sudah tentu kipas power supply langsung berputar.
Dan jika kipas power supply berputar, maka semua tegangan di setiap kabel dipastikan sudah ada. Dan untuk memastikannya maka kita ukur tegangan pada konektor dengan menggunakan multimeter.
Hubungkan kabel multimeter yg warna hitam ke salah satu kabel warna hitam dari PSU, kemudian hubungkan kabel warna merah multimeter ke setiap kabel yang berwarna selain warna hitam, hijau, dan abu-abu. Cek apakah disetiap warna kabel tersebut sudah sama nilainya sesuai dengan keterangan yang ada di casing penutup power supply tersebut.

Demikian yang semua yang saya ketahui untuk memperbaiki Power Supply Unit (PSU). Silahkan anda mencoba, semoga berhasil.

Jumat, 21 Desember 2012

Mengatur Lebar Image di Blogspot melalui URL

Pernahkah sobat bingung, ketika upload Image ke Blogspot, ukurannya seolah-olah menjadi kecil?
Lihat contoh berikut:


Alamat gambar: "https://blogger.googleusercontent.com/img/b/R29vZ2xl/AVvXsEh8rD67paJy1FWKQ1tsfPZ6A6s8aSYwcjNFTI8lmon-zDc5nH3Giu039-_Y2ED5qu7ZOCLmSwEVEyWqPSGhrj7xIjAlyX878U__TWlbnOdqWKKHnCiI4XTOwgmEzsDbPaSXiHffv8YWT1Y/s320/super-hero-movie-the-amazing-spider-man-2012-hd-wallpaper-930x300.jpg"

Gambar di atas memiliki lebar 930 pixel, namun ketika diupload ke Blogspot, gambar tersebut tampil dengan lebar berubah menjadi 320 pixel.

Lalu saya mencoba mem-paste alamat gambar di atas dengan menghilangkan tulisan "super-hero-movie-the-amazing-spider-man-2012-hd-wallpaper-930x300.jpg", ternyata gambar masih muncul dengan ukuran lebar 512 pixel.

Pada awalnya saya mengira "/s320/" pada alamat gambar di atas adalah nama folder di server blogspot. Lalu saya mencoba-coba untuk mengganti dengan "/s001/" (menjadi "https://blogger.googleusercontent.com/img/b/R29vZ2xl/AVvXsEh8rD67paJy1FWKQ1tsfPZ6A6s8aSYwcjNFTI8lmon-zDc5nH3Giu039-_Y2ED5qu7ZOCLmSwEVEyWqPSGhrj7xIjAlyX878U__TWlbnOdqWKKHnCiI4XTOwgmEzsDbPaSXiHffv8YWT1Y/s1/super-hero-movie-the-amazing-spider-man-2012-hd-wallpaper-930x300.jpg", dalam pikiran saya, akan muncul gambar yang diupload orang lain, ternyata yang muncul adalah gambar yang sama dengan ukuran 1 pixel.

Saya berpikir sejenak, mungkin "/s320/" bukan folder, melainkan ukuran lebar gambar. Kemudian saya coba untuk mengganti lagi dengan "/s930/", hasilnya....whola...gambar tampil dengan ukuran aslinya.


Kesimpulan:

Url gambar = "https://blogger.googleusercontent.com/img/b/R29vZ2xl/AVvXsEh8rD67paJy1FWKQ1tsfPZ6A6s8aSYwcjNFTI8lmon-zDc5nH3Giu039-_Y2ED5qu7ZOCLmSwEVEyWqPSGhrj7xIjAlyX878U__TWlbnOdqWKKHnCiI4XTOwgmEzsDbPaSXiHffv8YWT1Y/s320/super-hero-movie-the-amazing-spider-man-2012-hd-wallpaper-930x300.jpg" memiliki ukuran lebar 320 px

Url gambar = "https://blogger.googleusercontent.com/img/b/R29vZ2xl/AVvXsEh8rD67paJy1FWKQ1tsfPZ6A6s8aSYwcjNFTI8lmon-zDc5nH3Giu039-_Y2ED5qu7ZOCLmSwEVEyWqPSGhrj7xIjAlyX878U__TWlbnOdqWKKHnCiI4XTOwgmEzsDbPaSXiHffv8YWT1Y//super-hero-movie-the-amazing-spider-man-2012-hd-wallpaper-930x300.jpg" memiliki ukuran lebar 930 px 

Bila "/s930/" diganti dengan yang lebih besar dari lebar gambar yang diupload, maka lebar gambar tetap 930 px

Bila Url gambar kita hilangkan 2 bagian seperti ini = "http://2.bp.blogspot.com/-gACKHfWdU_k/UNPt6LgSrCI/AAAAAAAAAII/sQaKo1CkBCo" maka gambar tetap tampil dengan ukuran default 512 px

Fix: Microsoft Word has stopped working

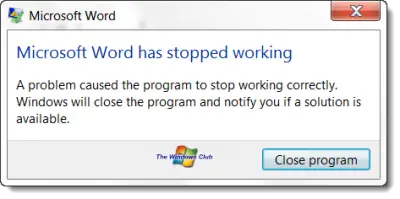
When I started getting this error Microsoft Word has stopped working – A problem caused the program to stop working correctly. Windows will close the program and notify you if a solution is available, on my one month old Office 2010 installation, I was a little like, hey WTF! I just could not open any Word documents. Well, in case you face the same issue, you can try this.
When you try to open any Word document, you get get these error dialog boxes and error message:

Microsoft Word has stopped working

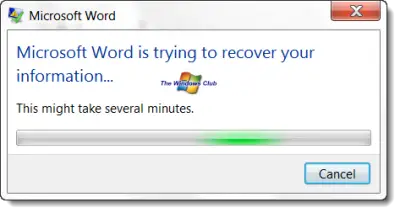
word crash error 400x213 Fix: Microsoft Word has stopped workingword stopped working 400x199 Fix: Microsoft Word has stopped working
Add-in’s are a very common cause why you could get such errors. What we need to do is disable the trouble-making add-in.
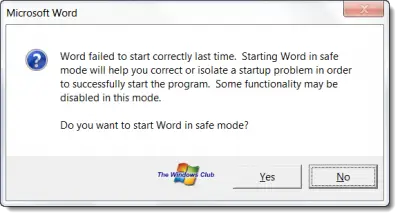
Type winword.exe /a in your Windows 7 or Vista start search and hit Enter. This will prevent Word from loading its add-ins. When asked if you want to open Word in Safe Mode, click on Yes.
word safe mode 400x217 Fix: Microsoft Word has stopped working
This will open Word in Safe Mode. Now click on File tab and select Options.
word 2010 options 600x428 Fix: Microsoft Word has stopped working
In the Word Options, select Add-Ins.
word options Fix: Microsoft Word has stopped working
Browse the active Add-ins for one’s you think may be causing Word to crash. In my case it was the Send to Bluetooth add-in which caused Word 2010 on my Windows 7 to crash. Click on Go to manage this add-in. Uncheck the trouble-making add-in and click OK.
disable word addins 600x231 Fix: Microsoft Word has stopped working
Close Word.
Now try to open any Word document. It should work!
If it doesn’t help you can try to reset Office Registry settings to default values.
If it still doesn’t help the best option would be to Repair Office. This post on how to repair Office 2010 or uninstall individual Office 2010 programs will show you how to do it.
If you have liked this post, you might want to check out some more, on topics like , .

source: http://www.thewindowsclub.com/fix-microsoft-word-has-stopped-working

Percantik Blog anda dengan Template dari BTemplate


Bosan dengan template yang ada di blogger? Ini saatnya anda mengganti template blog anda dengan template-template cantik dari BTemplates. Selain templatenya bagus-bagus, harganya adalah $0 alias gratis.
Cara setting dan penggunaannyapun sudah tersedia sehingga kita gak pake ribet untuk mengganti template pada blog sobat. Namun sang author template berpesan untuk tidak merubah tulisan dibagian paling bawah template.
Selamat ngacak-ngacak template!


Free Web Image Studio 1.1

Is the web entirely about graphics?

Graphics are the first thing your visitors see; they’re the ultimately important first impression. You need cool images that tell your story, fit your theme, and support your style. They aren’t the sole factor, but having the right tool to create and edit them is an absolute must.
That tool doesn’t need to be difficult to use. With Web Image Studio you can use one-click instant effects or a comprehensive panel of simple sliders. You can change the color of a photo or make specific colors or objects stand out. The possibilities are endless.
Want the full version? Get it for Windows | Get it for OS X
Enjoy creating icons, buttons, and illustrations for your website. It’s one powerful image editor — our customers agree…
This is an amazing image editor… The controls for editing icons are perfect. I can add shiny effects or change colors in a snap. Thanks CoffeeCup!
— Jean Gray
Get OS X Version Get Windows Version

Graphic editing can be easy.

How often have you opened a graphic editor that has so many hard-to-understand functions that it seems like the only thing it does well is confuse you? Too many times, right?
With the right workflow, making cool web graphics is easy and fun. Changing this apple from red to blue in other apps involves masking, layers, gradients, and a whole mess of filters and opacities. In Web Image Studio, it’s a matter of clicking the two shades of red and replacing them with shades of blue. Your graphic magically transforms while maintaining all the depth and details.

Give it a “Wow” factor.

The power to create your own professional-grade graphics is now within your reach. You can apply cool styles that give your graphics the extra “oomph” they need with a single click. Take light blue text and apply a dark blue stroke to give it a sharp-looking border. Apply a shadow to make the words stick up off the page. For a final touch, give it a yellow glow so it has a nice backlight. Your plain text just came to life!
Want to stretch, flip, and rotate text or other creations? You can do that too, of course!

Fix images in a snap.

For quick post-processing to make your photos shine before sharing them on the web, look no further than the incredible filters. A single click of the Lomography filter could be all you need to bring out the colors in your photo. Or try the color pop for an isolated color that makes you jump for joy.
Want full control? Open up the Adjustments for a panel of sliders that puts you in control of just about anything. Tweak brightness, colors, vignetting, and more to make images that look both modern and classic.
 
source: http://www.coffeecup.com/free-web-image-studio/

How to upload image to blogger

Can we get free image hosting?
I western union sri lanka talawakele have been looking for image hosting sites and found quite a few such as 
but was not too sure how reliable these image hosting sites were. When you upload images to this sites you should read their terms and conditions, where some of the sites claim your image as their images once you have hosted to their sites. This may sound simple, but at times it could be expensive.

If you are using blogger to host your blog, then you could upload images directly to blogger and share it anywhere you like. The only difference is that there are no folders where you could upload the images directly and use the link as in other traditional image hosting sites. Unlike blogger, other blog hosting sites such as wordpress have options of folders where you could upload your images and share them like the traditional image hosting sites.
So then how do we upload images and share them in blogger?
There could be many ways, but I will show you one of the ways in this article. Please follow the step by step guide to get your image uploaded to the blogger and share them. The tutorial assumes that you have already created your blog in blogger and are aware of the functionalities of the blogger and its options.
1) Login to your blogger and go to “Layout
xrangeglobal add picture widgets+copy How to upload image to blogger
2) In the Layout go to the end layout page and click on one of the “Add Widget” link to add a widget to your blog. Make sure that you use the one at the end of the page. This is because it will be not visible to every reader since its at the end of the page. (This is a temporary one)
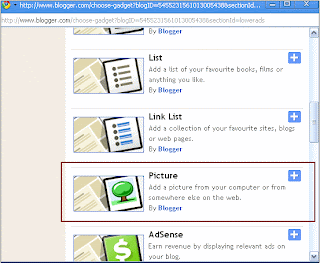
3) This will open up a list of available widgets that are supported in blogger. Scroll to the middle of the list and select the “Picture” widget from it.
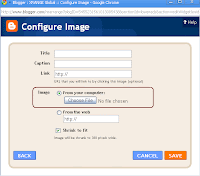
4) Once you have selected the Picture widget, it  will open up another window “Configure Image”, where you select which image to upload from your computer. You can ignore the Title and the Caption fields as this is a temporary one.
xrangeglobal configure image How to upload image to blogger
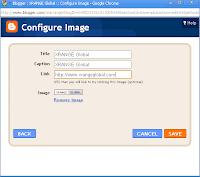
5) The image will be uploaded to the blogger, but you will not be able to see the link, unless you go to your browser and right click on the image and capture the “copy image URL” link, (used in Google Chrome, but will be different for different browser)
xrangeglobal configure image step2 How to upload image to blogger          xrangeglobal copy image url google chrome How to upload image to blogger
6) Open a new brower and paste the copied image URL into the browser to see if it shows the uploaded image. If you shows the uploaded image, then the copied URL is the link to that image and you can use it anywhere with your blog or any other sites you would like to show the image. 
xrangeglobal the image link 80x15 How to upload image to blogger
7) Your uploadded blogger image will be something like 
https://blogger.googleusercontent.com/img/b/R29vZ2xl/AVvXsEj5m4edHDz8eCoLjn1E-LzJ6xYcrzJNbVuiQIXZthzXeW7etg4a5WtUXDkGPNWM04_1S7x8AnhPpRVMgwsQvkDw99PFVo6QVbOqq4vAdNBTuu5sddFA3TFxYpEdTRqT_f0jZ4YMDk-Nu6Q/s380/xrangeglobal.gif
 
This is the end of this tutorial, where you have learnt how to upload an image to blogger (please do not upload copyright materials) and create a link which could be shared later.
 
 source: http://www.xrangeglobal.com/2009/01/how-to-upload-image-to-blogger/

Rabu, 19 Desember 2012

Cara Membuat Read More Pada Blog Secara Otomatis


Tutorial ini ditujukan kepada kawan-kawan yang masih menggunakan template bawaan blogger. Bila sudah menggunakan template dinamis, ini diabaikan saja yah. Kelebihan menggunakan template bawaan blogger adalah kita tidak hutang budi sama penyedia template blog gratisan sehingga menanamkan link/URL-nya di dalam blog kita. Oleh karena itu, Cara Membuat Read More Pada Blog Secara Otomatis ini sangat perlu digunakan. Oh iya, Cara Membuat Read More Pada Blog Secara Otomatis merupakan salah satu cara mempercantik tampilan blog.


Beginilah Cara Membuat Read More Pada Blog Secara Otomatis
1. Tentunya kawan-kawan harus membuka akun blog kawan sendiri.
2. Bila sudah masuk blogger (dasbor) pilihlan elemen Template lalu klik Edit HTML lalu klik Lanjutkan. 3. Centang Expand Template Widget (ada tanda kotak disamping tulisan itu)
4. Lalu carilah kode </head> (gunakan Ctrl + F, untuk mempercepat pencarian) lalu salin/copylah Kode di bawah ini dan tempatkan pas diatas kode </head> tadi.

<script type='text/javascript'>
var thumbnail_mode = &quot;float&quot; ;
summary_noimg = 150;
summary_img = 150;
img_thumb_height = 100;
img_thumb_width = 120;
</script>

<script type='text/javascript'>
//<![CDATA[

function removeHtmlTag(strx,chop){
if(strx.indexOf("<")!=-1)
{
var s = strx.split("<");
for(var i=0;i<s.length;i++){
if(s[i].indexOf(">")!=-1){
s[i] = s[i].substring(s[i].indexOf(">")+1,s[i].length);
}
}
strx = s.join("");
}
chop = (chop < strx.length-1) ? chop : strx.length-2;
while(strx.charAt(chop-1)!=' ' && strx.indexOf(' ',chop)!=-1) chop++;
strx = strx.substring(0,chop-1);
return strx+'...';
}

function createSummaryAndThumb(pID){
var div = document.getElementById(pID);
var imgtag = "";
var img = div.getElementsByTagName("img");
var summ = summary_noimg;
if(img.length>=1) {
imgtag = '<span style="float:left; padding:0px 10px 5px 0px;"><img src="'+img[0].src+'" width="'+img_thumb_width+'px" height="'+img_thumb_height+'px"/></span>';
summ = summary_img;
}

var summary = imgtag + '<div>' + removeHtmlTag(div.innerHTML,summ) + '</div>';
div.innerHTML = summary;
}
//]]>
</script>


 5. Sudah ditempatkan kode di atas bukan. Selanjutnya cari kode :
itemprop='description articleBody'>
<data:post.body/>
kemudian hapus kode <data:post.body/> tersebut dan gantikan kode scrip di bawah ini

<b:if cond='data:blog.pageType != &quot;item&quot;'>
<div expr:id='&quot;summary&quot; + data:post.id'><data:post.body/></div>
<script type='text/javascript'>createSummaryAndThumb(&quot;summary<data:post.id/>&quot;);</script>
<span style='float:right'><a expr:href='data:post.url'>Read More..</a></span>
<b:else/>
<data:post.body/>
</b:if>
6. Lalu simpan template blog anda kawan. Lihat hasilnya.

Hasilnya seperti yang sobat lihat di beranda setiono400.blogspot.com

Bagaimana Cara Membuat Read More Pada Blog Secara Otomatis di atas, gampang bukan. Sebenarnya menggunakan read more bisa kok secara manual, namun akan melakukan itu tiap memposting artikel yang baru. Oh iya, selamat mencoba yah. Salam sukses.

sumber: http://bos-tutorial.blogspot.com/2012/07/cara-membuat-read-more-pada-blog-secara.html

6 Free Conferencing Tools And Apps For Virtual Client Meetings

In an age of high gas prices, rising airline fees, outsourcing, and increasing use of social media for interaction, business trips to meet with clients are becoming a thing of the past. What was once a common occurrence has become less common – businesses can’t justify spending thousands of dollars to send someone halfway around the world (or even the country) for a 30 minute meeting.
Enter web conferencing, something people even one generation ago would have scoffed at as crazy talk. The ability to talk with and actually see someone from thousands of miles away? What was often treated as a nice idea has become a reality and is something used in many workplace environments today.

Looking for a free web conferencing tool to try out before fully committing to pay for one? Here are some services to try:

Skype

skype android 6 Free Conferencing Tools And Apps For Virtual Client Meetings
Perhaps one of the most popular video calling services, Skype is a great service to use for calls to one person. You can pay to get additional service which allows you to video conference with more than one person, but if you are looking for a free service to video conference with multiple people, Skype might not be the best for you. However, it is perfect for a one-on-one video call.

Face Time

iphone 4 face time 6 Free Conferencing Tools And Apps For Virtual Client Meetings
Similar to Skype, Face Time is a great free app (available on Macs, iPhones, iPod Touch, and iPads) for video calls to one person. As it is limited to these products, all of your clients might not have access to this app. If they do, however, it’s a great, free service to use.

SightSpeed

SightSpeed 6 Free Conferencing Tools And Apps For Virtual Client Meetings
A service of Logitech, SightSpeed’s website boasts being the “easiest to use” for video chat and voice calling. It can be used on Windows and Macs alike, making it easy for anyone to download and use.

Tokbox

Tokbox 6 Free Conferencing Tools And Apps For Virtual Client Meetings
Unlike many other video conferencing services, Tokbox doesn’t require downloads! Simply set up a channel, invite others to the video conference, and leave a video message if they aren’t there! Your conference can include up to twenty participants, and there is an area where you can type notes or keep minutes on the conference call.

Rondee

rondee conference calls 6 Free Conferencing Tools And Apps For Virtual Client Meetings
Rondee is a great service that helps you schedule your call ahead of time using e-mail and SMS text messages. You can send out invites, keep track of RSVPs, and send out reminders for the conference call. You can also record the call. This service only requires an email address to which a PIN code is sent. Then, all participants will use that number to log in to the call.

Wiggio

Wiggio is a great resource for people working in groups. It is a great way to coordinate events on a shared calendar, create to-do lists, poll your fellow group members, as well as video call. Part of this service’s aim is college students, so if you are looking for a bit more trendy service for younger clients, this might be the one.
The world has come a long way from having to drive (or walk!) to someone’s house to converse with them. In keeping up with our changing society, these services are convenient ways to get things done with multiple people.

How Blogging Can Help You Make Money

How Blogging Can Help You Make Money? Making money online is not an easy thing. When it comes to doing business on the internet, we talk about Forex, buying and selling of goods and all other similar trades, but people hardly associate blogging with money on the internet. And that’s partly because it never originated as a money making scheme. But a lot of things have changed and you can make money from the internet by doing virtually anything.
blogging make money How Blogging Can Help You Make Money
Blogging has since become a well admired means to make money on the internet, but a lot of bloggers are just out there blogging but they don’t know how they can monetize their blogging efforts. If you are reading this article, it’s either because you want to start a blog and you are already thinking of how you can make money from it or you simply want to find out how you can make money from your blog.

Promote Affiliate Programs

Affiliate marketing, as it is called, is now a very popular and reliable way for bloggers to make money on the internet. When you sell affiliate products on your blog, you have a percentage of the profit which goes to your Paypal account as commission. This is not only profitable for bloggers, but it is also helping the product owners to move their sales forward.
You might want to gain a considerable amount of blog followers and readers before you can consider doing affiliate marketing – as promoting another person’s product on your blog of little readership will not profit you.
If you are in haste to start making money through blogging by selling affiliate products and your blog hasn’t gained a lot of readers, I think you should start promoting your blog either by guest blogging or by exchanging links with other bloggers.

Partner With Advertisers

Secondly, a blogger can make money by partnering with advertisers. The internet is littered with companies and individuals looking to place adverts to their products on blogs, and most of them won’t consider the size of your readers as they are only after spreading word about themselves or their company.
But before looking out for advertising partners, you should make building your blog readership a priority. If your blog does not have a huge amount of readers, advertisers might not want to do serious deals with you.
Looking for an advertising agent can be a good thing if you want to make sure you get consistent advertising offers on your blog. Agents go out to look for people that are willing to advertise on your blog and they negotiate the price with you and their advertisers.

Work for Clients

Lastly, another method you can use to make money from your blog is by working for clients. Bloggers work as freelancers these days, and a lot of them are writers who get paid by clients. You can use your blog to promote your services to your potential clients and increase your opportunities to get gigs from different clients.
Working with clients might not be an easy task though, as you have to sacrifice your time to do their work. For this sake, it would be advisable that you hire writers for your blog or you open your blog for guest blogging so that other bloggers can help you fill the gap.

Conclusion

Making money online is not as easy as many think, but if you are smart enough to embrace every opportunity that is open to you now – you might be among the few that are making a killing on the internet today.

10 Hottest Windows 8 Tips and Tricks

Here are some of the best Windows 8 Tips and tricks. Windows 8 is here, and with it comes a drastic overhaul in desktop and tablet computing. These ten tips will help new Windows 8 adopters get over the learning curve and unleash their PCs.
Windows 8 Tips and Tricks 10 Hottest Windows 8 Tips and Tricks

1. The Lock Screen

With tablet users in mind, Microsoft has included a lock screen in Windows 8, but it’s not very intuitive. To unlock your Windows 8 PC, just press the space bar or scroll the mouse wheel. On a tablet, the gesture is a little more natural: Just swipe upward.

2. Closing Apps

Every previous version of Window has allowed users to close apps, but Windows 8 makes this simple feature a somewhat cryptic chore. It’s built to leave apps running, but if you want to close an app for whatever reason, then an old Windows standby still works. Just press Alt + F4 to close an app.

3. Traditional Desktop View

Whether users come from Windows 7 or another platform, they might sometimes desire to work from a traditional desktop. This view is still accessible in Windows 8 by pressing the Win key and D simultaneously.

4. Global Search

One of the most critical elements of any tablet or desktop operating system is the universal search. It may seem hidden in Windows 8, but simply typing from the Start screen will trigger such a search. Users can narrow the results down by file type and other criteria from here.

5. Taking Screenshots

Sometimes it’s necessary to capture a screenshot. Windows 8 users can do so by simultaneously pressing the Windows and Print Screen keys. The shot will be saved to the Pictures app.

6. Change File Associations

Multiple apps can work with most file types, but what if you don’t want to use the default app? Simply launch the Charms Bar, select the Programs tab and then click Default Programs. This lets you adjust file associations to your preferences.

7. View More Apps

The Live Tiles in Windows 8 are large by default, but what happens when you have dozens of apps? Hold down the control button and scroll your mouse, or use a pinch-to-zoom gesture on a tablet. Either of these will shrink your live tiles, letting you view more apps at once.

8. Quick Access Menu

Some utilities in Windows 8 are necessary, but don’t necessarily need to take up space as a Live tile. To access utilities such as Control Panel or Device Manager, just right-click in the bottom-left corner of the screen.

9. Side-by-Side Apps

Running two apps at once is one of the biggest benefits of desktop computing. In Windows 8, this is achieved by swiping in from the left. This displays the most recent app a user was running, and from there it can be brought up next to the current app.

10. Reinstall Windows

From time to time, the Windows platform can be sluggish. If a user needs to reinstall Windows, they can do so by accessing the Settings menu and choosing Refresh Your PC from the Change PC Settings tab.

Cara Nonaktifkan Klik kanan di Blogger / Blogspot

Pernahkah Anda memperhatikan, bahwa beberapa situs web tidak memungkinkan pengunjung mereka menggunakan klik kanan mouse pointer saat berada di area blog. Opsi ini berguna bagi pemilik situs dan blog, yang ingin meminimalkan kemungkinan menyalin konten langsung ke pos lain.
right click disable copy How to Disable Right click in Blogger / Blogspot ?
Untuk setup alat ini di blog kamu Salin kode berikut dan paste ke blog Anda dengan menambahkan elemen halaman baru. 


Langkah 1: Pergi ke Dashboard> Layout> Tambah Gadget> HTML / JavaScript

Langkah 2: Salin kode berikut ini dan tempel dalam widget blogger (select & gunakan Ctrl+C karena klik kanan di blog ini sudah di-disable).

<script language=JavaScript>
<!--

//Disable right mouse click Script

var message="Fungsi Cacat!";

///////////////////////////////////
function clickIE4(){
if (event.button==2){
alert(message);
return false;
}
}

function clickNS4(e){
if (document.layers||document.getElementById&&!document.all){
if (e.which==2||e.which==3){
alert(message);
return false;
}
}
}

if (document.layers){
document.captureEvents(Event.MOUSEDOWN);
document.onmousedown=clickNS4;
}
else if (document.all&&!document.getElementById){
document.onmousedown=clickIE4;
}

document.oncontextmenu=new Function("alert(message);return false")

// -->
</script>

Langkah 3: Simpan html / javascript dan melihat blog Anda.

Ketika Anda akan mencoba untuk melakukan klik kanan, pesan akan memberitahu Anda bahwa "Fungsi cacat", dan jika Anda ingin mengubah kata-kata ini "Fungsi Cacat" Maka cukup menemukannya dalam kode dan menggantinya.

Mendongkrak Traffic Ke Situs/Blog Anda

Cara gratis dan sederhana untuk meningkatkan traffic/pengunjung ke situs atau blog anda adalah dengan mengikuti 2 langkah sederhana,

Langkah pertama, daftarkan situs atau blog anda dengan mengklik banner di bawah ini:


Langkah Kedua, ikuti semua prosedur pendaftaran hingga anda menjadi member.

Langkah Ketiga, pastikan ada 10 orang yang mendaftar melalui referral url anda.

Langkah Keempat, tinggal menunggu hasil.

Kamis, 13 Desember 2012

Install Internet Download Manager Tanpa Crack


1.) Langkah pertama adalah matikan koneksi internet anda terlebih dahulu.
2.) Edit file hosts yang terletak di %windir%\system32\drivers\etc menggunakan wordpad/notepad.
3.) Tambahkan baris berikut dan simpan.


127.0.0.1 tonec.com
127.0.0.1 www.tonec.com
127.0.0.1 registeridm.com
127.0.0.1 www.registeridm.com
127.0.0.1 secure.registeridm.com
127.0.0.1 internetdownloadmanager.com
127.0.0.1 www.internetdownloadmanager.com
127.0.0.1 secure.internetdownloadmanager.com
127.0.0.1 www.secure.internetdownloadmanager.com
127.0.0.1 mirror.internetdownloadmanager.com
127.0.0.1 www.mirror.internetdownloadmanager.com
127.0.0.1 mirror2.internetdownloadmanager.com
127.0.0.1 www.mirror2.internetdownloadmanager.com
127.0.0.1 mirror3.internetdownloadmanager.com
127.0.0.1 www.mirror3.internetdownloadmanager.com


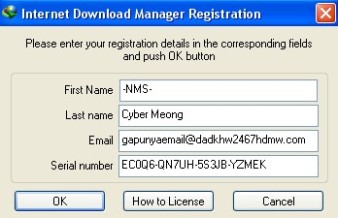
4.) Jika belum memiliki software IDM silahkan download di sini. (Karena file hosts di atas telah memblokir situs IDM, maka rename terlebih dahulu file hosts tersebut menjadi hosts.org. Jangan lupa untuk me-rename kembali  menjadi hosts setelah selesai download). Lalu install softwarenya.Setelah itu silahkan isi registrasi. Masukkan first name, last name, dan email terserah kita. Namun untuk serial number silahkan pilih salah satu dari serial number berikut ini:
W3J5U-8U66N-D0B9M-54SLM
EC0Q6-QN7UH-5S3JB-YZMEK
GZLJY-X50S3-0S20D-NFRF9

Gambar

5.) Klik OK.
Kini IDM anda telah menjadi full version dan bisa mendownload apapun sesuka anda :D

posting di atas telah mengalami proses editing dari sumber aslinya di: http://bacaanmenarikku.wordpress.com/2012/06/09/cara-install-idm-menjadi-full-version-tanpa-crack

How to setup a Windows Software RAID Mirror and Convert Basic Disks to Dynamic

This is a beginner level guide for Windows Administrators who are looking for clear and easy to follow steps on how to configure a Windows software RAID and convert basic disks to dynamic disks. Windows Software RAID is a simple and quick way to setup a RAID when you have limited resources. No special hardware is required, as so with a normal RAID (also known as a hardware RAID). In my example, I have two 1 terabyte hard drives. One of the hard drives has the OS installed on it, while the other hasn't been partitioned. This example is being performed on Windows Server 2003 Standard, however, most other Windows OS's have very similar steps.

To begin, open up Disk Management: Start > Run > diskmgmt.msc
disk1
You see the both disks. The online disk is listed first, and the second disk is labeled "Not Initialized". Right click on Disk 1 and choose "Initialize Disk":
disk3
Now right click on Disk 0 and choose "Convert to Dynamic Disk..."
disk2
A dialog box will pop up asking which disks you would like to convert to dynamic disks. Choose Disk 0 and Disk 1:
disk4
Click "Convert" to begin the process:
disk5
"After you convert these disks to dynamic, you will not be able to start other installed operating systems from any volume on these disks. Are you sure you want to convert?"
Choose Yes to accept the message:
disk6
"File systems on any of the disks to be converted will be dismounted. Do you want to continue this operation?"
Choose Yes to continue:
disk7
Click OK to restart:
disk8
After rebooting, open Disk Management. You will notice that the to disks are dynamic now:
disk9
Right click on Disk 0 and choose "Add Mirror...":
disk10
"Adding a mirror to an existing volume provides data redundancy by maintaining multiple copies of a volume's data on different disks. Select a location for a mirror of C:"
Choose Disk 1 to make a mirror of Disk 0 on it:
disk11
Now go back to Disk Management. You will notice that the two disks are syncing with each other. After they complete you will have a full mirror:
disk12
If you open up my computer, you will notice there is only one drive listed, however, it actually represents the two drives mirrored together:
disk13
That's all there is to it. It really is that simple. If you have any trouble with these steps, feel free to leave a comment!

Source: http://itswapshop.com/content/how-setup-windows-software-raid-mirror-and-convert-basic-disks-dynamic