Can we get free image hosting?
I western union sri lanka talawakele have been looking for image hosting sites and found quite a few such as
but
was not too sure how reliable these image hosting sites were. When you
upload images to this sites you should read their terms and conditions, where
some of the sites claim your image as their images once you have hosted
to their sites. This may sound simple, but at times it could be
expensive.
If
you are using blogger to host your blog, then you could upload images
directly to blogger and share it anywhere you like. The only difference
is that there are no folders where you could upload the images directly
and use the link as in other traditional image hosting sites. Unlike
blogger, other blog hosting sites such as wordpress have options of
folders where you could upload your images and share them like the
traditional image hosting sites.
So then how do we upload images and share them in blogger?
There could be many ways, but I will
show you one of the ways in this article. Please follow the step by step
guide to get your image uploaded to the blogger and share them. The
tutorial assumes that you have already created your blog in blogger and
are aware of the functionalities of the blogger and its options.
1) Login to your blogger and go to “Layout“

2) In the Layout go to the end layout
page and click on one of the “Add Widget” link to add a widget to your
blog. Make sure that you use the one at the end of the page. This is
because it will be not visible to every reader since its at the end of
the page. (This is a temporary one)
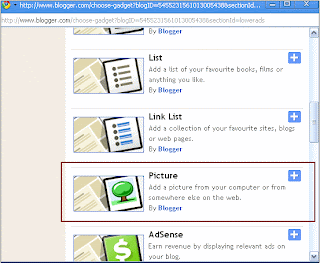
3) This will open up a list of
available widgets that are supported in blogger. Scroll to the middle of
the list and select the “Picture” widget from it.
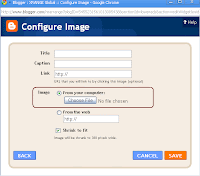
4) Once you have selected the Picture
widget, it will open up another window “Configure Image”, where you
select which image to upload from your computer. You can ignore the
Title and the Caption fields as this is a temporary one.

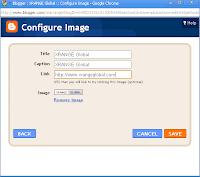
5) The image will be uploaded to the
blogger, but you will not be able to see the link, unless you go to your
browser and right click on the image and capture the “copy image URL”
link, (used in Google Chrome, but will be different for different
browser)
6) Open a new brower and paste the
copied image URL into the browser to see if it shows the uploaded image.
If you shows the uploaded image, then the copied URL is the link to
that image and you can use it anywhere with your blog or any other sites
you would like to show the image.
7) Your uploadded blogger image will be something like
https://blogger.googleusercontent.com/img/b/R29vZ2xl/AVvXsEj5m4edHDz8eCoLjn1E-LzJ6xYcrzJNbVuiQIXZthzXeW7etg4a5WtUXDkGPNWM04_1S7x8AnhPpRVMgwsQvkDw99PFVo6QVbOqq4vAdNBTuu5sddFA3TFxYpEdTRqT_f0jZ4YMDk-Nu6Q/s380/xrangeglobal.gif
This is the end of this tutorial,
where you have learnt how to upload an image to blogger (please do not
upload copyright materials) and create a link which could be shared
later.
source: http://www.xrangeglobal.com/2009/01/how-to-upload-image-to-blogger/


Tidak ada komentar:
Posting Komentar